
User Manual


Installation Instructions for Stanley Omnilock 9KOM Cylindrical Locks
Stanley Omnilock
a Product Group of Stanley Security Solutions, Inc.
10
Installing the lock
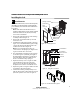
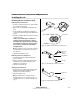
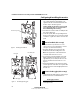
3 Insert the control key into the core and rotate the
key 15 degrees to the right.
4 Insert the throw member into the core.
5 Insert the core and throw member into the lever
with the control key
6 Return the control key to the original position
and withdraw the key.
Caution: The control key can be used to
remove cores and to access doors. Provide
adequate security for the control key.
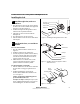
10 Test lock
To test the lock for proper operation before the lock
is programmed:
For keypad locks
1 Press 1234 for the 2000 series, or 5011234
for the 500 series.
The green light flashes and the latch unlocks.
2 Turn the lever and open the door.
During the unlock time, the green light flashes. Then
the red light flashes and the latch relocks.
For magnetic stripe or proximity card only locks
Note: If the lock has a proximity card reader, it may
have already been activated by the presence of an
object near the card reader.
1 Align the magnetic stripe card with the V mark by
the card slot.
2 Insert and then remove the card.
The green light flashes and the latch unlocks.
3 Turn the lever and open the door.
During the unlock time, if using the Programming
Default ID Card, the green light flashes. Then the red
light flashes and the latch relocks.
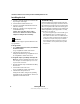
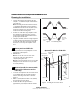
Troubleshooting
If the mechanism does not unlock, remove the bat-
tery cover and check for proper orientation and seat-
ing of the batteries and motor connector. Ensure that
wires are not pinched. Reset the electronics by press-
ing and holding the reset button on the circuit board
until the light flashes green (approx three seconds),
then release. See Figure 12.
The system will go through a self-test and the green
light will flash five times. You will hear the lock
unlock, then relock three times. A red flash indicates
a PC board or drive system problem. If a red flash or
no flash is observed, check for proper orientation
and seating of the batteries and motor connector,
ensure that wires are not pinched, then repeat the
reset process.