
User Manual


Installation Instructions for Stanley Omnilock 9KOM Cylindrical Locks
Stanley Omnilock
a Product Group of Stanley Security Solutions, Inc.
3
Installation Instructions for Stanley Omnilock 9KOM Cylindrical Locks
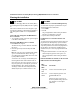
Preparing the door and door jamb
For doors with standard cylindrical preparation
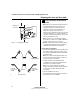
1 Fold the template on the dashed line. Looking
through the hole from the opposite side of the
door, align the template so that you see the
template outline of the 2 1/8” (54 mm) diameter
chassis hole.
2 Tape the template to the door and enter punch the
necessary drill points.
2 Drill holes and mortise for latch face
Note: To locate the center of a hole on the opposite
side of the door, drill a pilot hole completely through
the door.
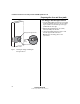
1 Drill the holes in order listed below:
■ motor wire hole
◆ 7/16” (11 mm) diameter through door
◆ always drill before drilling chassis hole
■ chassis hole
◆ 2 1/8” (54 mm) diameter through door
◆ drill after drilling motor wire hole
■ latch hole
◆ 1” (25 mm) diameter
◆ meets chassis hole
■(OPTIONAL) Door Status Switch
◆ 1” (25 mm) diameter on door
◆ 1” (25 mm) diameter on jamb
◆ 1-3/4” (44mm) deep on door
◆ 1” (25 mm) deep on jamb
Note: The latch tube prongs should be centered and
should project into the chassis hole.
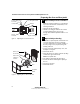
2 Mortise the edge of the door to fit the latch face.
3 Drill the holes for the latch screws.
4 Install the latch in the door as shown in Figure 4.
5 For optional door status switch: Position the bit
inside the hole. Then drill a 3/8” (10mm) channel at
an angle that will connect the door status switch
hole to the chassis hole as shown in Figure 4.
6 Press fit both switch pieces as shown in Figure 4.
7 Check that the door swings freely.
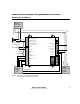
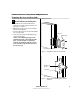
Figure 3 Drilling holes and mortising for the latch face
Latch hole
Inside of door
Optional door status
switch holes
Mounting hole
Chassis hole
Motor wire
notch
Mounting hole
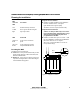
Figure 4 Installing the latch in the door
Location of latch
tube prongs
Chassis hole
Inside of door
Optional door
status switch
Caution: Make sure the wires are not routed across any sharp
edges or over any surface that could damage the sleeving.
Latch mortise
Latch