
User Manual


Installation Instructions for Wi-Q Technology™ EXQ Exit Hardware Trim
BEST ACCESS SYSTEMS
a Product Group of Stanley Security Solutions, Inc.
18
Completing the installation
18 Install battery pack in bracket
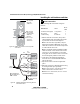
1 Connect the battery pack to the battery connector on
the wire harness as shown in Figure 29.
Caution: When connecting the battery pack,
make sure:
— there are no loose wire connections where the
wires are inserted into the connectors
— the connectors are firmly mated.
2 Place the battery pack in the holder inside the battery
bracket and dress the wire harness inside the bracket.
Caution: The battery pack fit will be snug. Make
sure you do not damage the sleeving on the bat-
tery pack. Doing so may cause the batteries to
drain.
3 If installing with a surface vertical rod device,
dress the wire harness inside the bracket to the left of
the rod so that the harness will not interfere with the
movement of the rods.
We recommend that you loosely coil the harness and
use a cable tie to secure the coil. To avoid damaging
the harness, do not put any sharp bends in it or flex it
close to the connectors.
Caution: Failure to dress the wire harness away
from the rod could damage the wire harness,
causing the lock’s electronics to not work prop-
erly.
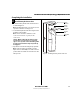
Figure 29 Connecting the battery pack
Battery pack
Inside of door
Battery bracket
Antenna wire
Relay shunt
wires
Installation Instructions for Wi-Q Technology™ EXQ Exit Hardware Trim
BEST ACCESS SYSTEMS
a Product Group of Stanley Security Solutions, Inc.
19
Installation Instructions for Wi-Q Technology™ EXQ Exit Hardware Trim
Completing the installation
19 Install battery/antenna cover
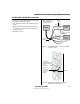
1 If installing with a surface vertical rod exit device,
carefully use a razor blade to remove the knockouts for
the rod from the battery cover. See Figure 30.
2 Connect the antenna to its mating connector.
3 Coil the antenna wire carefully inside the battery
cover.
Caution: Carefully bend, but do not twist or kink
the antenna wire. Doing so may significantly
reduce or completely interrupt signal transmis-
sion.
4 Making sure that the battery/antenna cover does
not pinch any wires, place the battery/antenna cover
over the bracket and battery.
5 Secure the battery cover with the provided self-tap-
ping screws.
Caution: Tighten screws firmly but do not over-
tighten. Over-tightening may strip screw holes or
crack the cover.
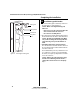
Figure 30 Installing the battery cover over the battery
bracket and connecting the antenna
Battery/
antenna cover
Antenna wire
Battery bracket
Carefully bend,
but DO NOT
TWIST OR KINK
the antenna
wire!
Knockout