
User Manual

Installation Instructions for Wi-Q Technology™ EXQ Exit Hardware Trim
BEST ACCESS SYSTEMS
a Product Group of Stanley Security Solutions, Inc.
10
Installing the exit hardware and trim
For Precision 2200, 2700 and 2800 devices
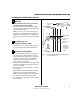
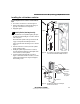
4 Re-route the sensor harness around the cylinder hole
and around the escutcheon boss, then out through the
alternate wire-routing hole as shown in Figure 13.
5 Reattach the backplate ensuring that the springs are
properly seated and wires are not pinched.
6 Reapply the gasket.
For Precision 2300 and Sargent 8800 devices
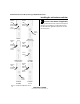
4 Re-route the sensor harness toward the top of the
escutcheon to the same area as the battery cable,
antenna cable and relay shunts. See Figure 14.
5 Reattach the backplate ensuring that the springs are
properly seated and wires are not pinched.
6 Reapply the gasket.
For Von Duprin Rim devices with RQE
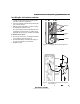
4 Re-route the sensor harness around the cylinder hole
and around the escutcheon boss, then out through
one of the alternate wire-routing holes (based on
handing) as shown in Figure 15.
5 Reattach the backplate ensuring that the springs are
properly seated and wires are not pinched.
6 Reapply the gasket.
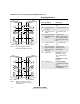
Figure 13 Re-routing the sensor harness for Precision
2200, 2700 and 2800 exit devices
Route
sensor
harness
here
Backplate
Sensor
harness
Route
sensor
harness
here
Backplate
Sensor
harness
Figure 14 Re-routing the sensor harness for Precision 2300
and Sargent 8800 exit devices
Route
sensor
harness
here for
LHRB
Backplate
Sensor
harness
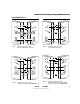
Figure 15 Re-routing the sensor harness for Von Duprin
with RQE
Route
sensor
harness
here for
RHRB
Installation Instructions for Wi-Q Technology™ EXQ Exit Hardware Trim
BEST ACCESS SYSTEMS
a Product Group of Stanley Security Solutions, Inc.
11
Installation Instructions for Wi-Q Technology™ EXQ Exit Hardware Trim
Installing the exit hardware and trim
For Von Duprin vertical rod devices and rim without
RQE
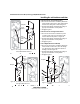
4 Re-route the sensor harness as shown in Figure 16.
5 Reattach the backplate ensuring that the springs are
properly seated and wires are not pinched.
6 Reapply the gasket.
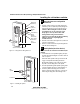
9 Install cylinder (Von Duprin only)
1 To determine the correct spindle length, try the cylin-
der in the door while holding the escutcheon and lock
stile case in place.
Then break off the spindle at the groove where it will
engage correctly with the latching mechanism.
If necessary break off the mounting screws as shown in
Figure 17.
2 From the front of the escutcheon, insert the cylinder
into the cylinder opening.
3 Holding the cylinder in position in the escutcheon,
insert the cylinder mounting sleeve through the back
of the escutcheon, over the cylinder.
4 Orient the cylinder and clamp plate as shown in
Figure 17. From the back of the escutcheon, secure the
cylinder and mounting sleeve using the clamp plate
and mounting screws.
Figure 16 Re-routing the sensor harness for Von Duprin
vertical rod and rim without RQE exit devices
Route
sensor
harness
here
Sensor
harness
Backplate
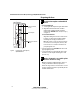
Figure 17 Installing the cylinder for Von Duprin
rim and rod exit devices
Rim
cylinder
Screws
Spindle
Clamp
plate
Break off the
screws here.
Orient the
curve toward
the cylinder.
Mounting
sleeve
Escutcheon