
User Manual

Installation Instructions for Wi-Q Technology™ EXQ Exit Hardware Trim
BEST ACCESS SYSTEMS
a Product Group of Stanley Security Solutions, Inc.
8
Installing the exit hardware and trim
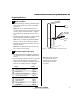
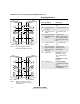
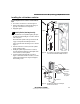
8 Re-route sensor harness (if applicable)
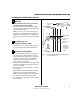
Looking at the back of the trim, compare it to the pictures
in Figure 10. If your trim does not match the proper pic-
ture, then follow the applicable steps below to re-route
the sensor harness.
Figure 10 Variations of EXQ Trim rear view
PHI Rim
(2100)
PHI Vertical
(2200/2700/2800)
PHI Mortise (2300)
& Sargent (8800)
Von Duprin
Rim (LHRB)
Von Duprin
Rim (RHRB)
Von Duprin
Verticals
Antenna
cable
Primary
harness
Sensor
harness
Antenna
cable
Primary
harness
Sensor
harness
Antenna
cable
Primary
harness
Sensor
harness
Antenna
cable
Primary
harness
Sensor
harness
Antenna
cable
Primary
harness
Sensor
harness
Antenna
cable
Primary
harness
Sensor
harness
Installation Instructions for Wi-Q Technology™ EXQ Exit Hardware Trim
BEST ACCESS SYSTEMS
a Product Group of Stanley Security Solutions, Inc.
9
Installation Instructions for Wi-Q Technology™ EXQ Exit Hardware Trim
Installing the exit hardware and trim
1 Carefully peel the black gasket off of the back of the
trim. Set it aside to be re-applied later.
2 Remove the backplate from the trim by removing the
four screws that attach it.
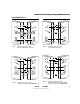
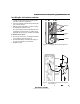
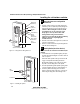
3 While the gasket and backplate are removed, change
the handing of the trim if necessary.
Do so by removing the four threaded guide pins and
retaining ring as shown in Figure 11, pulling out and
flipping the lever 180 degrees, and then reassembling.
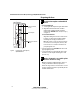
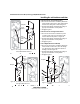
For Precision 2100 devices
4 Re-route the sensor harness out through the alternate
wire-routing hole as shown in Figure 12.
5 Reattach the backplate ensuring that the springs are
properly seated and wires are not pinched.
6 Reapply the gasket.
Figure 11 Changing the hand of the trim (if needed)
Retaining
ring
Guide pins
Lever
Yoke finger
Figure 12 Re-routing the sensor harness for Precision
2100 exit devices
Route
sensor
harness
here
Backplate
Sensor
harness