
User Manual

Installation Instructions for Wi-Q Technology™ EXQ Exit Hardware Trim
BEST ACCESS SYSTEMS
a Product Group of Stanley Security Solutions, Inc.
3
Installation Instructions for Wi-Q Technology™ EXQ Exit Hardware Trim
Preparing the door
1 Mark centerlines
Note 1: If retrofitting to an existing exit hardware instal-
lation, skip this task. Instead, remove the exit hardware
from the door.
Note 2: If the door is a fabricated hollow metal door,
determine whether it is properly reinforced to support the
lock. If door reinforcement is not adequate, consult the
door manufacturer for information on proper reinforce-
ment.
1 Prepare the push side of the door according to the exit
device manufacturer’s installation instructions.
Note: The tape-on template supplied with the EXQ trim
will supersede the exit device template in the trim area.
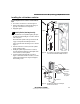
2 Transfer horizontal and vertical centerlines to the out-
side of the door face.
Note: When measuring from the edge of the door, take
into account the door bevel (if any).
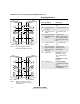
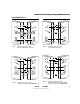
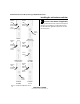
2 Determine required door prep
1 Determine which template is applicable (Q08 for Preci-
sion and Sargent, Q07 for Von Duprin) and discard the
other one.
2 Based on the kind of exit device you have, use the table
below to locate the appropriate door preparation.
3 On the template, circle the holes needed for your instal-
lation and cross out those that are not applicable.
n
Device Figure
Precision
Rim (2100) Figure 2
Surface Vertical (2200) Figure 3
Mortise (2300) Figure 4
Wood Door Concealed (2700) Figure 3
Concealed Vertical (2800) Figure 3
Von Duprin
Rim (with RQE) Figure 5
Rim (without RQE) Figure 7
Surface Vertical Figure 7
Concealed Vertical Figure 7
Sargent Rim Figure 6
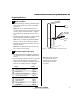
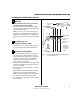
Figure 1 Marking centerlines on outside door face
Vertical
centerline
Horizontal
centerline
Straight
edge
Note: Follow the Precision 2300
door preparation for Sargent,
ignoring any steps directly per-
taining to the mortise lock or
key cylinder.