
User Manual

Installation Instructions for Wi-Q™ Technology 45HQ Mortise Locks
BEST ACCESS SYSTEMS
a Product Group of Stanley Security Solutions, Inc
Installing the trim
6
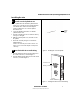
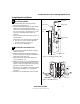
11 Route wire harnesses and position
outside escutcheon
1 From the outside of the door, feed the motor
connector, battery connector, and sensor connectors
through the harness hole.
Caution: When routing the connectors, make sure the
harnesses are not routed across any sharp edges or over
any surface that could damage their sleeving or wire
insulation.
2 Perform these steps:
a Firmly press the outside escutcheon in position on
the door. The core should be flush with the outer
surface of the escutcheon.
b If necessary, adjust the cylinder depth plus or
minus one turn so that the core is flush with the
outer surface of the escutcheon.
c Secure the cylinder in the mortise case with the
cylinder clamp screw.
3 Rest the outside escutcheon on the door by inserting
the trim studs into the trim holes.
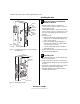
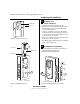
12 Install fire plate
1 From the inside of the door, feed the wiring through
the fire plate harness hole.
2 Position the fire plate on the door so that the inside
mounting plate fits through the square opening in the
fire plate.
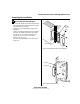
3 Insert the two counter sunk mounting screws into the
holes at the top and bottom of the fire plate.
4 Tighten the mounting screws until the fire plate is
securely mounted to the door.
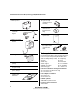
Figure 10 Feeding the wire harness connectors through
the harness hole
Motor
connector
Outside
escutcheon
Outside of door
Sensor
connectors
Battery
connector
Harness
hole
Antenna
Figure 11 Installing the fire plate
Inside of door
Mounting
screws
Antenna
wire