
User Manual

Installation Instructions for Wi-Q™ Technology 45HQ Mortise Locks
BEST ACCESS SYSTEMS
a Product Group of Stanley Security Solutions, Inc
5
Installation Instructions for Wi-Q™ Technology 45HQ Mortise Locks
Installing the trim
9 Install concealed cylinder & core
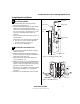
1 Use a cylinder wrench to thread the cylinder into the
mortise case so that the groove around the cylinder is
even with the door surface as shown in Figure 8.
Caution: A malfunction can occur if the cylinder is
threaded in too far.
2 Secure the cylinder in the mortise case with the
cylinder retainer screw.
3 Insert the control key into the core and rotate the key
15 degrees to the right.
4 With the control key in the core, insert the core into
the cylinder.
5 Rotate the control key 15 degrees to the left and
withdraw the key.
Caution: The control key can be used to remove cores
and to access doors. Provide adequate security for the
control key.
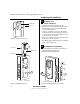
10 Install trim hole insert and bushing
1 Insert the trim hole insert into the upper trim hole on
the outside of the door, as shown in Figure 9.
2 Insert the bushing into the harness hole on the outside
of the door, as shown in Figure 9.
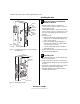
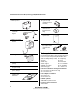
Figure 8 Installing the concealed cylinder
Cylinder
retainer
screw
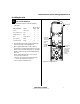
Figure 9 Installing the trim hole insert and bushing
Trim hole insert
Bushing
Outside of door