
User Manual


Installation Instructions for Wi-Q™ Technology 45HQ Mortise Locks
BEST ACCESS SYSTEMS
a Product Group of Stanley Security Solutions, Inc
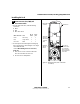
Preparing the door
2
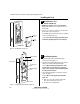
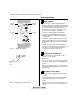
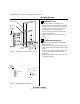
2 Align templates
Note: If the door is a fabricated hollow metal door,
determine whether it is properly reinforced to support
the lock. If door reinforcement is not adequate, consult
the door manufacturer for information on proper
reinforcement. For dimensions for preparing metal
doors, see the Q03 Template—Installation
Specifications for 45HQ Mortise Locks (T82603).
1 Separate the four templates provided on the
Q06
Template—Installation Template for 45HQ Mortise
Locks
(T82606).
2 Position one of the door edge templates on the door,
making sure that the lock case mortise shown on the
template aligns with the mortise pocket prepared in
the door.
3 Using the centerlines on the door edge template as a
guide, position the appropriate door template on each
side of the door. You need to take the bevel into
account. Tape the templates to the door.
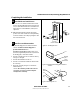
3 Center punch and drill holes
1 Center punch the necessary drill points. See the
instructions on the template.
2 Drill the holes.
Note 1: To locate the center of a hole on the opposite
side of the door, drill a pilot hole completely through
the door.
Note 2: For holes through the door, it is best to drill
halfway from each side of the door to prevent the door
from splintering.
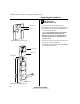
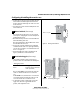
4 Install door status switch
(optional for deadbolt TV function locks
only)
1 Position the shield on the door status switch with the
notch facing downwards (towards the mortise
pocket).
Caution: Make sure the wires are not routed across any
sharp edges or over any surface that could damage its
sleeving.
Figure 2 Aligning the templates
Installation
template
Door edge
template
Centerline
Centerline
Figure 3 Installing the door status switch
Door
status
switch
Shield