
User Manual

Installation Instructions for Wi-Q™ Technology 9KQ Cylindrical Locks
7
Installation Instructions for Wi-Q™ Technology 9KQ Cylindrical Locks
Installing the lock
BEST ACCESS SYSTEMS
a Product Group of Stanley Security Solutions, Inc.
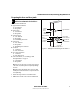
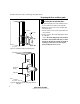
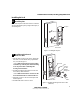
7 Remove outside lever or knob
1 Insert the control key into the core and rotate the key
15 degrees to the right.
2 Insert a flat blade screwdriver into the figure-8 core
hole and into the lever.
3 Press the screwdriver blade in the direction of the
arrow in Figure 7.
Note: You cannot remove the lever if the screwdriver
blade is inserted too far past the keeper.
4 Slide the lever or knob off of the sleeve.
Caution:
Be careful that you do not disconnect the
lever keeper spring.
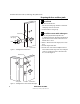
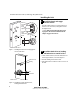
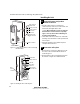
8 Adjust for door thickness
1 Determine the door’s thickness.
2 Pull the rose locking pin and rotate the outside rose
liner until the proper groove on the through-bolt stud
lines up with the hub face.
Figure-8
core hole
Figure 7 Removing the outside lever
Insert screwdriver
blade here.
Lever keeper
Figure 8 Adjusting the rose liner for the door
thickness
1 3/4″
2″
2 1/4″ groove
Through-
bolt stud
Hub face
Outside
rose liner
Rose locking pin
Motor wire