
User Manual

Installation Instructions for Wi-Q™ Technology 9KQ Cylindrical Locks
4
Preparing the door and door jamb
BEST ACCESS SYSTEMS
a Product Group of Stanley Security Solutions, Inc.
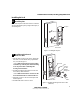
3 Install latch
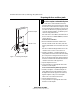
1 Install the latch in the door.
Note: The latch tube prongs should be centered and
should project into the chassis hole.
2 Check that the door swings freely.
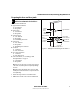
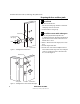
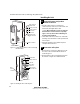
4 Install door status switch and magnet
1 On the door jamb, mark the drill point for the
1″ diameter magnet hole. This hole should be directly
opposite the door status switch reader harness hole
when the door is closed.
2 Drill a 1″ diameter hole for the magnet, at least 1 3/4″
deep.
3 Insert the magnet in the hole.
4 Insert the door status switch assembly into the door
status switch hole in the edge of the door, feeding the
connectors out the harness hole to the inside of the
door, as shown in Figure 4.
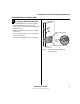
Figure 3 Installing the latch in the door
Latch
Location of latch
tube prongs
Chassis hole
Inside of door
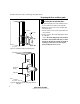
Figure 4 Installing the door status switch and magnet
Magnet
Harness hole
Inside of door
Door
status
switch
Door jamb