
User Manual

Installation Instructions for Wi-Q™ Technology 9KQ Cylindrical Locks
3
Installation Instructions for Wi-Q™ Technology 9KQ Cylindrical Locks
Preparing the door and door jamb
BEST ACCESS SYSTEMS
a Product Group of Stanley Security Solutions, Inc.
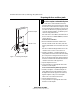
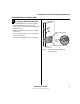
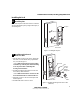
2 Drill holes and mortise for latch face
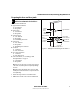
1 Drill the holes listed below:
■ upper and lower trim holes
◆ 5/8″ diameter
◆ through door
■ harness hole
◆ 3/4″ diameter
◆ through door
■ motor wire hole
◆ 7/16″ diameter
◆ through door
◆ before drilling chassis hole
■ chassis hole
◆ 2 1/8″ diameter
◆ through door
◆ after drilling motor wire hole
■ latch hole
◆ 1″ diameter
◆ meets chassis hole
■ door status switch hole
◆ 1″ diameter
◆ meets harness hole
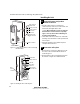
■ anti-rotational hole, see “Use drill jig to drill
through-bolt holes” on page 5.
◆ 5/16” diameter
◆ through door
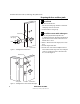
Note 1:
To locate the center of a hole on the opposite
side of the door, drill a pilot hole completely through
the door.
Note 2:
For holes through the door, it is best to drill
halfway from each side of the door to prevent the door
from splintering.
2 Mortise the edge of the door to fit the latch face.
3 Drill the holes for the screws used to install the latch.
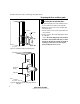
Figure 2 Drilling holes and mortising for the latch face
Latch hole
Upper trim hole
Harness
hole
Motor wire hole
Chassis hole
Lower trim hole
Latch face
mortise
Inside of door
Door
status
switch hole
Anti-rotational
hole
Anti-rotational
hole