
User Manual


104
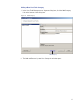
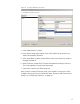
Figure 73 User Groups Setup
2 The groups you create display on the left. The group’s ID, Name, Associations
and Timezone appear on the right.
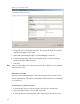
3 Select Add. A new Group (Group1) is created and displays on the left.
4 In the Group Name box, replace the name Group1 with a name for the new
group (for example, Administrative).
5 Select OK.
Note Once you have added users to the system via the Users Tab, you can assign them
to these User Groups.
Removing User Groups
In the User Group Setup dialog box, select the group you wish to remove and se-
lect the Delete button. The group is immediately removed from the list, along with
its associations.
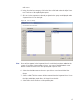
Associating Users with User Groups
1 In the Segment Tab, Associations category, click the User Groups field.
2 Select the ellipsis button at the far right of the field.
3 In the User Groups Setup dialog box, select the group you wish to associate