
User Manual


123
The following sections describe each category in the Users Tab, and present steps
for adding and configuring users in the system.
ID — When you add a user, the system automatically assigns them a unique ID
and displays the number in the User ID field.
Name — Provides entry fields for Users’ first and last name and middle initial.
Adding a User Name
1 In the Users Tab, select the Add User button. In the ID category, the system will
display a new unique User ID.
2 In the First Name line, highlight and replace the default text (example: User1)
with a first name.
3 In the Last Name field, highlight and replace the default text
(“_New”) with a last name. Add a Middle Initial if needed.
Note The Update button will flash to remind you to update your settings. You can update
each time you add a user, or wait until all user information is added. The software
will automatically update your settings when you exit the Users tab.
User Defined Categories and Fields— If your segment has been configured with
user defined categories and fields, such as Address, City, Zip Code, enter the
information as configured.
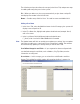
Associations — In this category, you associate Users with Readers and User
Groups. This task defines which readers will recognize the User’s requests for
entry and exit. If User Groups have been created for your organization, these will
also be available for selection from the Associations category.
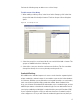
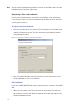
To associate a user with readers
1 In the Associations category, click inside the Readers field, and select the el-
lipsis button at the far right.
2 The Readers of User dialog box opens and displays a list of readers available to
the User.
Figure 86 Readers of User