
Operation Manual


Page 106 CP190i and CPF190i
NOTE
Note the CP190i and CPF190i have only one NMEA Input so Port1 will have to be set to
MOBILARM.
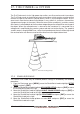
Port1 Example
Chart Plotter MOBILARM
Blue NMEA Out
Brown NMEA In
Red GPS V+
Black GPS V-
NOTE
Refer to the Figure 16.0, the Blue and Brown wires are from Port1. If these wires are being used
to connect to another NMEA device, choose another wire pair and configure the port associated
with the wires.
16.1 SOFTWARE SETUP
After the Port has been chosen and connected in Par. 16.0, the GPS Chart Plotter must be
setup to communicate with the MOBILARM.
Use the steps below to set up the Port the MOBILARM is connected to the GPS Chart
Plotter.
1. Select the Chart page.
2. Press [MENU], move the ShuttlePoint knob to highlight SETUP MENU and press
[ENT].
3. Move the ShuttlePoint knob to highlight
ADVANCED SETUP and press [ENT] or move
the ShuttlePoint knob to the right.
4. Move the ShuttlePoint knob to highlight
IN/OUT CONNECTIONS and press [ENT] or
move the ShuttlePoint knob to the right.
5. Move the ShuttlePoint knob to highlight any input port and press [ENT] or move the
ShuttlePoint knob to the right.
6. Move the ShuttlePoint knob up/down to select
MOBILARM and press [ENT] or move
the ShuttlePoint knob to the right. Selecting MOBILARM format, activates the function.
7. Press [CLR] or move the ShuttlePoint knob to the left until the Chart page is shown.
The GPS Chart Plotter continuously verifies the communication status with MOBILARM
PTX (Personal Transponder) device. When a signal from the PTX is lost for more than one
minute, the MOBILARM sends a NMEA message to the GPS Chart Plotter which will
produce an alarm and a popup window will be shown on Standard Horizon GPS Chart
Plotter.
16.2 MOBILARM STATUS
To confirm the status of the MOBILARM, select the About page:
1. Select the Chart page.
2. Press [MENU] two times. Move the ShuttlePoint knob to highlight
About... and press
[ENT].
On the About page you can see the status of the MOBILARM, below are the possible
messages.