
User manual: SW V1.0

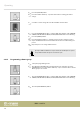
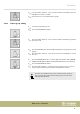
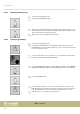
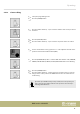
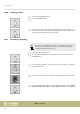
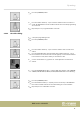
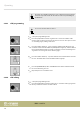


Table Of Contents
- Table of contents
- 1 General information
- 2 Safety instructions
- 3 Features
- 4 Installation
- 5 Connections and operating elements
- 6 Operating
- 6.1 ‘Setting’ menu
- 6.1.1 Create a new fixture profile
- 6.1.2 Modify a fixture profile
- 6.1.3 Delete a fixture profile
- 6.1.4 Patch a fixture
- 6.1.5 Reverse channel setup
- 6.1.6 Fade mode select
- 6.1.7 Blackout mode select
- 6.1.8 Midi channel select
- 6.1.9 Chase run by inside / outside time
- 6.1.10 Auto remote address
- 6.1.11 Reading from a USB drive
- 6.1.12 Writing to a USB drive
- 6.1.13 Modify password
- 6.1.14 Enable / disable the password
- 6.1.15 Erase all memory
- 6.1.16 Adjust audio input range
- 6.1.17 Channel value display mode
- 6.2 Programming mode
- 6.2.1 Programming a scene
- 6.2.2 Programming a scene with movement
- 6.2.3 Editing a scene
- 6.2.4 Copying a scene
- 6.2.5 Deleting a scene
- 6.2.6 Copying a bank
- 6.2.7 Programming a chase
- 6.2.8 Chase programming from all scenes of a bank
- 6.2.9 Replacing scenes of a chase
- 6.2.10 Adding scenes to a chase
- 6.2.11 Deleting scenes from a chase
- 6.2.12 Deleting a chase
- 6.2.13 Preset programming
- 6.2.14 Preset editing
- 6.2.15 Programming a fixture group
- 6.2.16 Fixture group editing
- 6.2.17 Deleting a fixture group
- 6.2.18 Center programming
- 6.2.19 Center editing
- 6.2.20 Deleting a Center
- 6.2.21 Override programming
- 6.2.22 Override editing
- 6.2.23 CUE programming
- 6.2.24 CUE editing
- 6.2.25 Deleting a Cue
- 6.2.26 Blackout scene programming
- 6.3 Function mode
- 6.4 Fogger operation
- 6.5 Strobe operation
- 6.6 Software update
- 6.1 ‘Setting’ menu
- 7 MIDI functions list
- 8 Notes on creating profiles
- 9 Technical specifications
- 10 Protecting the environment

3. Use the channel faders or jog wheels # 1–# 4 to create the desired Blackout
scene.
4. Then press the [MANUAL/REC] button to save. Now the LEDs of the buttons
CUE, OVERRIDE, CENTER, FIXTURE GROUP, PRESET, CHASE, BANK and
BLACKOUT are ashing.
5. Press the [BLACK OUT/STAND ALONE] button. All LEDs ash three times and
thus indicate the successful saving of a Blackout scene.
6.3 Function mode
After switching on, the LED of the [FIXTURE] button should light up. If you have set
the DMX addresses of the connected devices as recommended
Ä
Chapter 6.2 ‘Pro‐
gramming mode’ on page 29 you can address them via the number buttons [1 – 20]
and control them using the channel faders. For complex eects sequences you will
certainly want to use these three operating modes:
· Manual mode (MANUAL)
· Sound-controlled mode (SOUND)
· Automatic mode (AUTO)
These modes are available after pressing the [BANK] button to call up programmed
scenes, or after pressing the [CHASE] button to call up Chases.
Then press the button [MANUAL/REC], [MUSIC/BANKCOPY] or [AUTO/DEL] to call up
the manual, sound-controlled or automatic mode.
6.3.1 Calling up scenes
Static scenes from the memory bank can only be used in manual mode. In the sound-
controlled or automatic mode, the unit activates the programmed scenes of a bank
successively.
Operating
DMX controller
50