
Installation Instructions


5
INSUFFICIENT, A PRIMER CAN BE UTILIZED TO IMPROVE ADHESION. NOTE THAT WORKING
AND OPEN TIMES OF ADHESIVES MAY VARY BASED ON JOB CONDITIONS, SUBSTRATE,
TEMPERATURE AND HUMIDITY.
Use an A2 glue trowel to glue to ensure an even and correct distribution of vinyl glue over the base
floor.
Apply the vinyl glue on the floor for about the same width as the two first rows. Always take into
account the instructions of the vinyl glue.
Place the planks into the adhesive, adjust the correct position and push or roll down to ensure good
adhesive transfer to the back of the planks.
All glue residue should immediately be removed with a damp cloth. Never use detergents.
Use the same procedure to complete the rest of the room.
Use a heavy roll to ensure the best bonding and adhesive transfer. Wait no longer than 30 minutes
before rolling on the installed area.
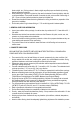
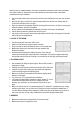
3. LAYOUT OF THE ROOM
Find the center point of the room. Strike a line.
Obtain a true 90’ angle by using a carpenter’s square.
Strike a second line which will divide the room in to four equal parts.
Measure the distance from the center to the wall, parallel to the
direction of the plank.
Divide the measurement by the width of the plank. If less than half
remains as the border plank, adjust the point to compensate. This will give a larger border along
the wall and reduce the chance of having to cut a small sliver of flooring to place along the wall.
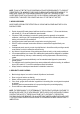
4. FLOORING LAYOUT
We recommend dry fitting first (without glue). Start the first row with a
whole plank in length.
Carefully place the first piece of plank at the junction of the chalk lines.
Continue to lay the plank, making sure each plank flush against the
chalk line and tight against the adjoining plank.
Make sure the plank is well seated into the adhesive paying special
attention, to the edges.
Lay row by row, or in a pyramid fashion (see below).
It is strongly recommended to stagger the rows by at least 12” / 30 cm
so that the short edge seams are not in a straight uniform line.
However, you may want to try other patterns of planks to suit your
taste.
Make sure the first rows are on a perfect straight line. For instance, it is possible that your starting
wall has a slight angle. You can check this by holding a thin rope and adjust the straightness of
your floor where necessary. Before placing the planks in the glue, please make sure you have cut
them to the right size, so they neatly fit between the wall and the already installed plank.
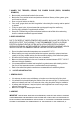
5. BORDERS
Measure the distance from the last plank in the row to the wall.
Mark the plank and cut it against the mark.