
User's Manual


___________________________________________________________________________________
Master Meter, Inc. 101 Regency Pkwy, Mansfield, TX 76063 T: 817-842-8000 F: 817-842-8100 MasterMeter.com
7
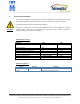
9. Installation Requirements
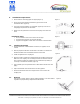
1. Ensure that the connecting pipes are aligned (Figure 1).
2. Check for the proper distance between the pipe unions to avoid
mechanical stress. (Figure 2)
3. The meter may be installed in any orientation. (Figure 3) There are no
straight pipe requirements on the Sonata.
4. Always use new gaskets and ensure that the coupling nut surfaces are
clean.
Installation Notes
• Do not install the meter on the suction side of a pipe.
• Avoid exposing the meter to excessive vibration.
• Support of the pipeline on both sides of the meter is recommended.
10. Installing the Sonata
1. Unpack the Sonata. Install/assemble accessories, is supplied, and as
needed.
2. Note the proper flow direction as indicated on the meter. The Sonata is a
bi-directional flow meter and will also measure reverse flow.
3. Install new gaskets in the coupling nut.
4. Place the meter in position and carefully tighten the coupling nuts by hand.
Make sure each coupling nut is smoothly screwed onto the meter threads.
Use a wrench to tighten the coupling nuts to a minimum torque setting of
10 lb-ft up to a maximum of 35 lb-ft. (Figure 4)
5. Once installed, open the upstream valve to allow water to fill the meter and
piping.
6. Open a downstream valve to flush all air out of the pipeline.
7. Close the downstream valve and verify that there are no leaks at the
coupling nuts.
11. Disposal
This product contains Lithium Thionyl Chloride batteries. Local and national
regulations for proper battery disposal should be followed.
Figure 1
Figure 2
Figure 3
Figure 4