
User's Manual


ST Engineering Telematics Wireless Ltd
15
◦ Sending the required information of each LCU NEMA as it is installed to the CMS Administrator,
by calling or messaging.
◦ Updating the CSV file with the LCU serial number and coordinate values obtained during the
installation.
9. Installing the LCU NEMA
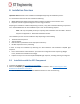
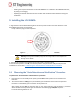
1. Align the LCU until the North Marking Arrow at the top cover will be in the same direction as the
North Marking Arrow at the receptacle.
Firmly insert the plug into the receptacle:
Figure 1 - Top view of the NEMA receptacle showing the North direction
Warning: Inserting the LCU NEMA prongs into the wrong sockets in the receptacle can
damage the LCU NEMA
2. Twist the LCU clockwise until the LCU stops moving and is securely locked.
3. If the electrical power is not ON, turn ON the power to the pole and be ready to verify that the
installation is correct. See 9.1. Observing the “Auto Detection and Verification” Procedure.
9.1 Observing the “Auto Detection and Verification” Procedure
To perform the “Auto Detection and Verification” procedure:
1. If the luminaire is not already under power, power ON the main power line connected to the
luminaire.
2. The luminaire will turn ON (light on) immediately upon installation of the LCU to the powered
luminaire or immediately upon connection of the power line.
After initially turning ON, the luminaire will run the “Auto Detection and Verification” procedure
which identifies the lamp driver type and executes the following light ON/OFF sequence:
In case of dimming method 0 – 10: