
Owner's Manual
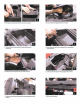
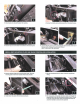
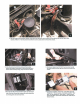
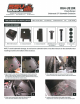

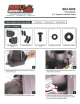

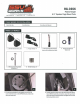

Table Of Contents

E.
Place
SSV
bracket
B
over
the
factory
screw
holes
and
refasten
down
with
the
(3)
factory
T40
torx
screws
removed
in
the
previous
step.
F.
With
the
bracket
secured
to
the
floorboard,
place
the
enclosure
in
front of
the
floorboard
bracket.
To
allow
proper
engagement,
tilt
the
enclosure
back
slightly
and
slide
its
bottom
bracket
into
the
floorboard
bracket
catch.
G.
With
the
brackets
seated
into
one
another,
use
the
front
mounting
tabs
as
a
template
to
mark
with
a
scribe
or
punch
the
needed
placement
to
drill pilot
holes.
H.
Once
marked,
remove
the
enclosure.
Using
a
13/6!1" drill
bit,
drill pilot
holes
at
your
marked
points.
Be
sure
to
penetrate
through
the
chassis
lying
beneath
the
floorboard.
I . .
Re-install
the
sub-enclosure.
Secure
the
front
mounting
tabs
with
the
kit
provjde
T30
torx
self-tapping
screws.
J.
Connect
sub
to
harness
8-H
1151
from
the
battery
compartment.
K.
Connect
the
dash
end
of
the
8-H
1151
harness
to
the
amp
.