
Owner's Manual


F.
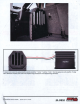
Remove
the
(2)
T50
torx
screws
from
the
driver
rear
windowsill.
The
(2)
factory
screws
will
be
re-used
to
fasten
the
MB
-1
Bracket
to
the
windowsill
and
secure
the
JJL-DS10
to
the
vehicle.
G.
Remove
the
(1)
rear
seat
mounting
nut
with
a
18mm
socket.
The
MB
-2
bracket
will
be
placed
over
this
mounting
stud
that
the
(1)
nut
was
removed
from
.
For
a
hassle-free
installation,
we
recommend
having
a
second
set
of
hands
to
help
position
the
assembled
sub
enclosure
into
its
position
in
the
vehicle.
From
the
rear
passenger
door
and
the
rear
cargo
area,
lift
the
unit
into
place
as
a
team.
I.
Before
fastening
the
enclosure
into
place
,
check
bracket
"
MB-
1"
position
for
any
height
adjustment that
may
be
needed
for
alignment
with
the
factory
mounting
holes.
Re-fasten
the
(2)
factoryT50
screws
through
bracket "
MB-1
"
and
into
the
windowsill.
H.
Pull
the
seat
belt
forward
and
set
the
enclosure
in
place.
"
MB
-1"
bracket
will
rest
on
the
windowsill, "
MB
-2"
bracket
will
go
over
the
rear
seat
mounting
stud
.
J.
Re
-
fasten
the
(1)
18mm
nut
to
the
rear
seat
mounting
stud
securing
the
Bracket
"MB-2".
JJL-0S10
d
IIICIRKS
•