
Install Instructions
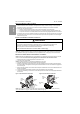
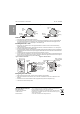

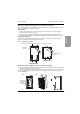
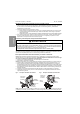
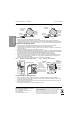
Table Of Contents
- H2G Generic Topic 2nd Level - Surface Mounting (Indoor and Outdoor)
- H2G Generic Topic 2nd Level - Outdoor
- H2G Generic Topic 2nd Level - Surface Mounting
- H2G Generic Topic 2nd Level - Flush Mounting (Indoor Enclosure Only)
- H2G Generic Topic 2nd Level - Main Circuit Breaker or Main Lug Wiring
- H2G Generic Topic 2nd Level - Branch Circuit Breaker Installation and Removal
- H2G Generic Topic 2nd Level - Standard and Tandem Branch Circuit Breakers—Installation
- H2G Generic Topic 2nd Level - Removal
- H2G Generic Topic 2nd Level - Installing the Cover / Trim
- H2G Generic Topic 2nd Level - Energizing the Load Center

QO™ and Homeline™ Load Centers Rev. 03, S1B33894
ENGLISH
Schneider Electric USA, Inc.
800 Federal Street
Andover, MA 01810 USA
1-888-778-2733
www.se.com/us
Electrical equipment should be installed, operated, serviced, and maintained
only by qualified personnel. No responsibility is assumed by Schneider Electric
for any consequences arising out of the use of this material.
Schneider Electric and Square D are trademarks owned by Schneider Electric
Industries SAS or its affiliated companies. All other trademarks are the property
of their respective owners.
© 2012–2021 Schneider Electric All Rights Reserved
Removal
Installing the Cover / Trim
Energizing the Load Center
Figure 6: Homeline Standard Circuit Breaker Figure 7: Homeline Tandem Circuit Breaker
1. Turn OFF (O) the circuit breaker. Remove the wires.
2. To disconnect the plug-on jaw from the connector and mounting rail, lift the plug-on end of the circuit breaker until
the circuit breaker jaw disconnects from the bus bar. Continue lifting until the terminal end disengages from the
mounting rail. See Figure 4, 5, or 6 depending on circuit breaker type.
1. Remove the cover twistouts. Remove the appropriate twistouts to match the number of circuit breakers being
installed. See Figure 8.
2. Attach the Spanish translation label, supplied with the load center, to the inside of the door or cover. See Figure 9.
3. Identify the circuit breakers on the directory label.
4. For service equipment, apply the “Service Disconnect” label(s) near the disconnect handle(s). If the main circuit breaker is
installed and the device is used as a branch panel, apply the “Main” label to the trim near the main circuit breaker handle.
See Figure 9.
5. Install the trim/cover using the screws provided and torque to 20 lbs-in. (2.3 N•m).
6. For QO outdoor load centers that are 150–225 A single-phase, main lug devices rated for 22,000 RMS symmetrical
amperes short circuit systems, use four screws by removing the interior trim support bracket knockout. See Figure 9.
7. Fill any unused circuit breaker opening with the filler plates.
Figure 8: Remove Twistouts Figure 9: Label Locations
1. Before energizing the load center, turn off the main and all branch circuit breakers.
2. After power is turned on to the load center, turn on the main circuit breaker and then turn on the branch circuit
breakers.
3. Rotate the door latch counterclockwise to allow engagement through the door slot (outdoor only).
4. Close the door until secured by the latch.
Wire
terminal
end
Plug-on
jaw
Bus bar
connector
Mounting
rail
Wire
terminal
end
Plug-on
jaw
Bus bar
connector
Mounting
rail
Spanish
label
Interior trim support
bracket knockout
Main or service
disconnect label
(if required)
Directory label
Spanish
label
Main or service
disconnect label
(if required)
Door latch
Cover
directory
label
Outdoor Indoor