
Manual


English
3
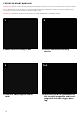
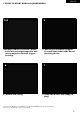
OPERATION GUIDE / ART UP
1. Always attach a barrel blocking device over the tip of the barrel for safety precautions when not shooting/
playing.
2. Spyder recommends having the Marker in the SAFE MODE position before use. To operate, push the safety
button from the “PUSH SAFE” side of the Trigger Frame. This will position the Marker in a lock SAFE MODE.
To disengage the safety button in a safely manner, point the Marker in a safe direction, and push the safety
button towards the opposite side of the Trigger Frame. CAUTION: Do not disengage safety button until step 6.
3. Attach a CO2/Compressed Air Tank to the Markers Rear Body ASA adapter. Using a CO2/Compressed Air Tank
firmly tighten clockwise to the Markers Rear Body ASA adapter until it is snug. HELPFUL TIP: Make sure to
have the CO2/ Compressed Air Tank filled before attaching. NOTE: O-rings in the Markers parts kit are NOT
supplied to attach on a CO2/Compressed Air Tank. IMPORTANT: You should never need to use any hand tool
to attach a CO2/ COMPRESSED AIR TANK to the Markers Rear Body ASA adapter. (SEE CO2/COMPRESSED
AIR TANK WARNING)
4. Attach the Magazine to the Trigger Housing or attach Paintball Loader to the Markers Clamping Feed Neck and
tighten the set screw. NOTE: Fill Loader with only (.68 Cal.) paintballs/Fill Magazine with (.68 Cal.) or First
Strike™ paintballs. NEVER mix First Strike™ Paintballs and (.68cal) Paintballs inside a Straight Magazine.
5. Cocking the Marker. With a firm grip on the Pump Handle simply pull towards the rear of the Receiver to latch
on the Back Hammer Bolt/Sear, then push forward. CAUTION: You should never pump the Marker Twice. This
will double feed the Marker and could cause a breakage of Paint in the breach/barrel.
6. Remove the barrel blocking device from the barrel. Now you can release the safety button. CAUTION: With the
safety button released in the FIRE position the Marker is ready to shoot/play. Pulling the Trigger will fire a
paintball. IMPORTANT: Only test your Marker in a safe direction or in a designated playing field.
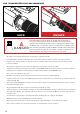
7. Performing a Velocity (fps) check. IMPORTANT: The breach must be empty of Paintballs. CAUTION: Do Not
look down the Barrel for any reason. Using the Velocity Tuning Tool slide it down the barrel until the Tool locks
inside the Hammer Velocity Adjuster. Turning the Velocity Tool clockwise will increase the Velocity (fps) turning
it counter-clockwise will decrease the Velocity (fps). NOTE: Your Marker is intended to be used in a paintball
facility with the proper paintball protection. IMPORTANT: Spyder recommends using a chronograph to ensure
Marker’s velocity is under 300 (fps).
8. When finished playing, remove all paintballs from the Magazine / or Loader. Then detach the loader from the
Markers feed neck by loosening the set screw on feed neck clamp. CAUTION: There may be one paintball in the
Marker’s breach; take a shot or two in a safe direction to make sure the barrel and Receiver are empty.
9. Place the barrel blocking device over the barrel tip. This will help avoid any accidental discharge.
10. Spyder recommends having the Marker in the SAFE MODE and un-cocked position after use.
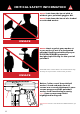
11. Unscrew the CO2/Compressed Air Tank from the Markers Rear Body ASA adapter. By turning the tank counter
clockwise will detach from the Markers Rear Body ASA adapter. CAUTION: Never expose any skin underneath
the Rear Body ASA adapters bleed hole when removing the tank. This can run the risk of getting skin burn from
the releasing of the GAS. IMPORTANT: You should never need to use any hand tool to detach a CO2/Com-
pressed Air Tank from the Markers Rear Body ASA adapter. (SEE CO2/COMPRESSED AIR TANK WARNING)
12. Store the Marker in a paintball bag or in a safe place. WARNING: Before/after use of the Marker, make sure to
fasten all screws. Loose screws may prevent the Marker from functioning properly. HELPFUL TIP: Before stor-
ing the Marker, make sure the Marker is in the SAFE MODE, un-cocked position without air source attached,
make sure all paintballs inside the Marker have been removed and with barrel blocking device ON.
IMPORTANT
• Firing velocity may vary according to altitude and climate conditions.
• Before using your Marker in play, you must always first perform a “SAFE VELOCITY TEST”. This can only be
accomplished by using a testing device called a “Velocity Chronograph“ and can be performed at a paintball
dealership or local playing field. NOTE: This product is intended to be used at a velocity no greater than
300 feet per second (fps). Paintball Markers are not intended to shoot within 30 feet.
• This paintball Marker may have excess gas after the removal of the CO2 / Compressed Air Tank. Please
remove all paintballs and discharge the remaining gas safely.
• Never store a CO2 / Compressed Air Tank attached to the Marker.