
Manual

12
A JAMMED PAINTBALL
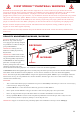
In the event of a paintball break follow this guide to help un-jam the Marker. The Markers breach is located where
the barrel starts to thread in the Receiver and underneath the Markers feed neck. Before attempting to un-jam
the Marker you should always have your Goggles or Safety Glasses on. Make sure the Marker is in the SAFE
MODE position before attempting to un-jam the Front Hammer Bolt. Remove the CO2/Compressed Air Tank before
attempting to un-jam the Marker. Remove all paintballs from the Magazine and Loader. Have the barrel removed from
the Barrel Sleeve Adapter to allow the paintball(s) to exit. Grip the Pump Handle and with enough force re-cock the
Marker to release the Front Hammer Bolt from the jammed position. Then see (SQUEEGEE CLEANING OF BARREL
AND BREACH).
DANGER: Never look down the barrel of the Marker when loaded or unloaded. Remove the attached CO2/Com-
pressed Air Tank before attempting to un-jam the Front Hammer Bolt.
SQUEEGEE CLEANING OF THE BARREL AND BREACH
Using a Stick Squeegee (not included)
DANGER: Do not look down the Marker barrel. Always wear goggles specifically designed for paintball use while
working on your paintball Marker.
IMPORTANT: Always have the Marker on SAFE MODE before disassembly. Remove all paintballs and air source from
the Marker before performing any maintenance.
Slide a stick squeegee down the barrel until it reaches the Markers breach. Then remove the stick squeegee out
of the barrel. This should wipe clean any paint residue that could have broken inside the Marker. HELPFUL TIP:
Make sure the Markers breach is clean and clear of any paintball shell fragments or dirt. Repeat this step if the paint
residue did not wipe clean after the first attempt.
Using a Cable Swab Squeegee (not included)
Twist off the barrel and slide a cable swab squeegee from the open end so the swab is the last portion of the
squeegee out of the barrel tip. Grab hold the tail of the cable squeegee and pull. This should wipe clean any paint
residue that could have broken in the barrel. HELPFUL TIP: Make sure the Markers breach is clean and clear of any
paintball shell fragments or dirt. Repeat this step if the paint residue did not wipe clean after the first attempt.
WARNING: Before/after use of the Marker, make sure to fasten all screws. Screws may become loose due to
vibration. Loose screws can be dangerous and cause injury.
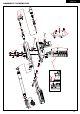
To assure Marker is assembled properly, follow the schematic drawing or position parts in order during disassembly.
Parts assembled backwards or improper parts installed will / can cause the Marker to malfunction.
WARNING: Never attempt to remove the Markers internals while the CO2/Compressed Air Tank is attached. Make
sure to remove all paintballs from loader/magazine before disassembling the Marker.
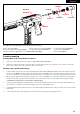
CUP SEAL REMOVAL
WARNING: Never attempt to remove the Markers internals while the CO2/Compressed Air Tank is attached. Make
sure to remove all paintballs and loader before disassembling the Marker.
The following steps will provide easy access to the Cup Seal. The sign of a worn Cup Seal is the presence of CO2/
Compressed Air leaking down the barrel. HELPFUL TIP: Do not rush or skip any of the steps for proper disassembly
of the Marker.
STEP 1 With the Allen wrench tool remove, the rear Trigger Frame Screw. Slide out the entire Rear Body ASA from
the Receiver.
STEP 2 Use an adjustable wrench and remove the Power Tube Valve Seat off the Rear Body ASA. This will expose
all the Internals housed in the Rear Body ASA.
STEP 3 Detach the Power Tube Valve Spring and twist off the Cup Seal from the Power Tube. HELPFUL TIP: If the
Cup Seal is on tight use pliers on the head of the Cup Seal and twist off.
STEP 4 Replace a new Cup Seal provided inside the parts kit to the Power Tube.
Once these steps have been completed, reassemble all parts back in the Rear Body ASA.
HELPFUL TIP: Please note how the parts are removed for easy reassembly.