
Manual


English
9
INSTALLING A CO2 / COMPRESSED AIR TANK
Firmly screw the CO2/Compressed Air Tank clockwise into the Markers Rear Body ASA Adapter. HELPFUL TIP:
Before installing a CO2/Compressed Air Tank, make sure that the tank is full and that it has a urethane bottle O-ring
on the top of the valve to prevent air leaks. IMPORTANT: You should never need to use any hand tool to attach a
CO2/Compressed Air Tank to the Rear Body ASA Adapter.
REMOVING A CO2 / COMPRESSED AIR TANK
Firmly unscrew the CO2/Compressed Air Tank by turning the tank counter-clockwise until it comes out of the Rear
Body ASA Adapter. HELPFUL TIP: After firing the Marker, you should ALWAYS remove the CO2/Compressed Air
Tank before storing. When the tank is being removed, excess air will release from the Rear Body ASA Adapter.
CAUTION: Never expose any skin to the Rear Body ASA Adapters bleed hole when removing the tank. This is to
avoid the risk of getting skin burn from the escaping GAS.
IMPORTANT: You should never need to use any hand tool to detach a CO2/Compressed Air Tank from the Rear Body
Adapter. If you cannot remove a tank by hand please see a certified airsmith for assistance.
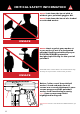
PROPER USE OF YOUR BARREL BLOCKING DEVICE
A Barrel Blocking Device or “BBD” is an essential part of your paintball safety equipment. The Barrel Blocking
Device is designed to stop a paintball from exiting a paintball marker accidentally. Improper use of the Barrel
Blocking Device will not provide protection..
BARREL SOCK/BAG TYPE DEVICE
Place the bag/sock part of the Barrel Blocking Device over the end of your barrel and wrap the elastic cord around
the back end of your Marker. Adjust the length of the elastic cord to make sure your Barrel Blocking Device fits
securely over your Markers barrel. NOTE: If the elastic cord is too long you can tie a couple of knots around the cord
to shorten its length.
BARREL PLUG TYPE DEVICE
Insert the barrel plug securely into the end of your Markers barrel before proceeding to load paintballs and screwing
in your tank to your Marker.
The barrel plug should fit firmly into the barrel with a significant amount of resistance. NOTE: The barrel plug should
not be easy to remove and always inspect the O-rings to make sure they are not worn or cut.
IMPORTANT: Remove the Barrel Blocking Device only when you are getting ready to begin play or have been
instructed to do so by a field safety official. Always keep your Barrel Blocking Device on your Marker after you have
finished playing. Keep it in place even after you have emptied all paintballs and removed your air tank from your
paintball Marker. WARNING: Inspect your Barrel Block Device regularly for wear and any tear, if it is worn, replace it
immediately.
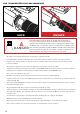
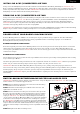
SWITCH LOADING BETWEEN MAGAZINE FEED AND HOPPER FEED
IMPORTANT: The Barrel Sleeve Adapter out of the box is setup for Magazine Feed. HELPFUL TIP: The stock Barrel
on the Hammer 7 is a standard Spyder thread.
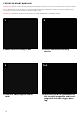
STEP 1 Remove both Feed Neck Screws and remove the Picatinny
Feed Neck Cover from the Receiver.
STEP 2 Attach Vertical Clamping Feed Neck to the Receiver and
tighten the Feed Neck Screws.
STEP 3 Remove the Barrel Locking Screw located at the top of the
Receiver. Then pull the Barrel along with the Barrel Sleeve Adapter
out of the Receiver and reinsert to align which position you desire
to play in. HELPFUL TIP: The Barrel Sleeve Adapter has markings
“L” for Loader and “M” for Magazine. Make sure to align the markings
of the Barrel Sleeve Adapter to the Receiver markings for a proper
fit. IMPORTANT: The Barrel Sleeve Adapter is housing both the Ball
Detents. When switching from Loader or to Magazine you may need
to press down on the Front and Rear Ball Detent so they are secure to
the Barrel Sleeve Adapter. This will help prevent a paintball roll out the
barrel.
STEP 4 Retighten the Barrel Locking Screw.
3
2
1
4
Front
Detent
Rear
Detent