PUMP - ACTION MARKER User Manual English Français
English PUMP - ACTION MARKER TABLE OF CONTENTS IMPORTANT SAFETY GUIDELINES 2 OPERATION GUIDE / START UP 3 7 STEPS TO START AND PLAY 4-5 CRITICAL SAFETY INFORMATION 6 RECOMMENDED PAINTBALL SAFETY GEAR 7 CO2 / COMPRESSED AIR TANK WARNINGS 8 INSTALLING & REMOVING A CO2 / COMPRESSED AIR TANK 9 PROPER USE OF YOUR BARREL BLOCKING DEVICE 9 SWITCH LOADING BETWEEN MAGAZINE FEED HOPPER FEED 9-10 LOADING PAINTBALLS IN THE MAGAZINE 10 VELOCITY ADJUSTMENT INCREASE / DECREASE 11 A JAMMED PAINTBALL
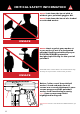
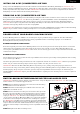
IMPORTANT SAF Y GUIDELIN WARNING • This paintball Marker is NOT a toy. Misuse can cause serious injury or death. • Spyder recommends that the customer must be at least 18 years of age to purchase this product. Person under 18 years of age must have adult supervision when using this product. • Read this User manual before using this product.
English OPERATION GUIDE / START UP 1. Always attach a barrel blocking device over the tip of the barrel for safety precautions when not shooting/ playing. 2. Spyder recommends having the Marker in the SAFE MODE position before use. To operate, push the safety button from the “PUSH SAFE” side of the Trigger Frame. This will position the Marker in a lock SAFE MODE.
7 STEPS TO START AND PLAY IMPORTANT: Please read the Safety and Operation Guidelines before you start the 7 quick steps to Start and Play. NOTE: The Hammer 7 out of the box is equipped with Picatinny Feed Neck Cover Plate, ready for magazine play. See page 9 for instructions on how to switch to hopper play. IMPORTANT: The Barrel must be installed before loading the Magazine or Paintball Loader. 1 1. Make sure the safety is ON. 3 3. Install a CO2/Compressed air tank. 4 2 2.
English 7 STEPS TO START AND PLAY (CONTINUED) 4.B 4.B) OR Load 9 First Strike™ paintballs in the straight magazine and insert magazine into the trigger housing. 6 6. Unlock the safety. 5 5. Put on your paintball goggles first and then remove the barrel blocking device. 7 7. Pump the marker and ready to play. IMPORTANT: Make sure the Marker is in the SAFE MODE and the barrel blocking device is on the Marker’s barrel after PLAY.
CRITICAL SAFETY INFORMATION NEVER look down the barrel with or without your paintball goggles ON. NEVER look down the barrel of a loaded or unloaded marker. WARNING: UNSAFE NEVER shoot or point your marker at a person that is not in a designated paintball facility and without proper EYES/FACE/EARS protection designed specifically for the sport of paintball. *Paintball marker model shown is for demonstration only and may not represent the marker model you have.
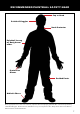
RECOMMENDED PAINTBALL SAFETY GEAR Cap or Hood Paintball Goggles Neck Protector Paintball Jersey w/ Body Armor under Protective Gloves Padded Pants Athletic Shoes Wear appropriate dress attire to avoid any exposed skin when playing paintball. We recommend purchasing a Paintball Goggles, Neck Protector, Paintball Jersey or Long Sleeve shirt, Body Armor, Protective Gloves, Athletic Shoes and Padded Pants.
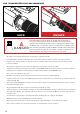
CO2 / COMPRESSED AIR TANK WARNINGS SAFE DAN GER UNSAFE The CO2/Compressed Air Tank can fly off with enough force to cause serious injury or death if the Valve unscrews from the cylinder head. LOOK at the Valve when removing the cylinder from the Marker. Be sure that the valve is turning with the cylinder rather than remaining stationary with the Marker. STOP if the Valve starts to unscrew from the cylinder. If in doubt, screw the cylinder back onto the Marker and contact a trained person for repair.
English INSTALLING A CO2 / COMPRESSED AIR TANK Firmly screw the CO2/Compressed Air Tank clockwise into the Markers Rear Body ASA Adapter. HELPFUL TIP: Before installing a CO2/Compressed Air Tank, make sure that the tank is full and that it has a urethane bottle O-ring on the top of the valve to prevent air leaks. IMPORTANT: You should never need to use any hand tool to attach a CO2/Compressed Air Tank to the Rear Body ASA Adapter.
INSTALLING / REMOVING A PAINTBALL LOADER HELPFUL TIP: The Vertical Clamping Feed Neck is not attached to the Receiver when purchased new. Attach a gravity or electronic paintball loader to the markers Feed Neck and tighten the Feed Neck Screw. Use only (.68 cal) paintballs through a paintball loader. Loosen the Feed Neck Clamping Screw and remove the gravity or electronic paintball loader. When removing the loader make sure to remove all paintballs.
English FIRST STRIKE™ PAINTBALL WARNING Paintball is an extreme sport. Misuse of the equipment can cause serious injury or death. Due to the physical attributes of First Strike paintballs, the following must be adhered too. When using First Strike paintballs in Spyder paintball markers, all players must wear the following: full-face paintball goggles that protect face, eyes and ears, cap or hood for the back of the head, neck protector, long sleeve top, pants and full finger gloves.
A JAMMED PAINTBALL In the event of a paintball break follow this guide to help un-jam the Marker. The Markers breach is located where the barrel starts to thread in the Receiver and underneath the Markers feed neck. Before attempting to un-jam the Marker you should always have your Goggles or Safety Glasses on. Make sure the Marker is in the SAFE MODE position before attempting to un-jam the Front Hammer Bolt. Remove the CO2/Compressed Air Tank before attempting to un-jam the Marker.
English ITP023 REC095 ITP028 REC096 SPR033 ITP027 ORG031 ASA095 SCR019 Part Names and Numbers described in this section: Power Tube (#ITP027) Power Tube Valve Seat (#ITP028) Power Tube Valve Spring (#SPR033) 13° Rear Body ASA (#ASA095) Hammer 7 Receiver (black/olive green) (#REC095/#REC096) O-ring #112 12.37 (#ORG031) Frame Screw (#SCR019) Cup Seal (#ITP023) Troubleshooting Dealing With An Air Leak Down The Barrel 1. Cup Seal is bad and needs to be replaced. (SEE CUP SEAL REMOVAL) 2.
HAMMER 7™ PARTS LIST 1 ASA095 13° Rear Body ASA 26 RPN021 Trigger Roll Pin (large) 2 BAR002 Orange Blaze Rubber Ring 27 SAB004 Safety Button (C) 3 BAR003 Spyder Barrel Plug 28 SCR016 M5 x 12 Screw (A) Frame Screw 4 BAR095 12" Barrel w/STD Thread AR15 Muzzle Brake 29 SCR018 M3 x 8 Screw (+) Grip Panel Screw 5 BAR092 Barrel Sleeve Adapter 30 SCR019 M5 x 28 Screw (A) Frame Screw 6 BLS095 Rubber Ball Stopper 31 SCR048 Feed Neck Clamp Screw & Nut 7 FND080 Polymer Vertical Clamping
2 50 3 20 14 9 35 4 39 37 49 10 35 6 20 34 11 5 49 15 28 38 36 8 7 32 42 31 33 27 47 23 24 30 12 46 26 43 29 29 25 17 21 44 13 18 40 19 16 41 45 1 English HAMMER 7™ SCHEMATICS 15
WARRANTY ATEMENT Spyder warrants the original retail purchaser that this product is free from defects in material and workmanship under normal use and service for a period of (1) year from the original date of purchase. Any Electronic Components in an Electronic Spyder marker are warranted for (6) months from the original date of purchase. Spyder agrees to repair or replace (at its discretion) any product within (a reasonable period of time). This warranty does not cover o-rings, Eko™ Cup Seals, 9.
Français PUMP - ACTION MARKER TABLE DES MATIERES IMPORTANTES CONSIGNES DE SECURITE 20 MISE EN ROUTE 21 7 ÉTAPES POUR COMMENCER À JOUER 22-23 INFORMATIONS IMPORTANTES DE SÉCURITÉ 24 ÉQUIPEMENT DE SÉCURITÉ RECOMMANDÉ POUR LE PAINTBALL 25 CONSIGNE DE SECURITE SUR LA BOUTEILLE DE CO2/AIR COMPRIMEE 26 DEMONTER UNE BOUTEILLE DE CO2/AIR COMPRIME 27 UTILISATION APPROPRIEE DU BOUCHON DE CANON 27 CHANGEMENT DE CANON ENTRE CHARGEUR ARSENAL ET CHARGEUR TRÉMIE 27-28 INSTALLATION/RETRAIT D’UN CHARGEUR
IMPORT C ECURITE WARNING • Ce marqueur de paintball n’est PAS un jouet. Une mauvaise utilisation peut entraîner des blessures graves ou la mort. • Spyder recommande que le client ait au moins 18 ans pour acheter ce produit. Les personnes de moins de 18 ans doivent être surveillées par un adulte lorsqu’elles utilisent ce produit. • Veuillez lire ce manuel de l’utilisateur avant d’utiliser ce produit.
Français MISE EN ROUTE 1. 2. 3. 4. 5. 6. 7. 8. 9. 10. 11. 12. Toujours garder son lanceur éteint ou sur le mode “safe” jusqu’a son utilisation. Spyder recommande d’avoir le lanceur en position “SAFE” avant l’utilisation. Pour verrouiller la sécurité, pousser le bouton du coté “PUSH SAFE” de la poignée. Cela enclenchera la sécurité. Pour désengager la sécurité d’une manière sécurisée, pointer le lanceur dans une direction sans risque et poussez le bouton du coté “PUSH FIRE” de la poignée.
7 ÉTAPES POUR COMMENCER À JOUER IMPORTANT: Lire les recommandations de sécurité et de fonctionnement avant de suivre les 7 étapes rapides pour commencer à jouer. REMARQUE: Le marteau 7 out of the box est équipée de Picatinny Feed Neck couvrir plaque, prêt pour le jeu magazine. Voir la page 27 pour obtenir des instructions sur la façon de passer à trémie jouer. IMPORTANT: Le canon doit être installé avant de charger le Magazine ou le chargeur de Paintball. 1 1. Assurez-vous que la sécurité soit sur ON.
Français 7 ÉTAPES POUR COMMENCER À JOUER (continuer) 4.B 4.B) OR Charge 9 First Strike™ balles de peinture dans le magasin anglé et magazine insert dans le corps du déclencheur. 6 6. Déverrouillez la sécurité. 5 5. Chaussez vos lunettes de paintball tout d’abord et puis retirez le dispositif de blocage du canon. 7 7. Le marqueur de la pompe et prêt à jouer.
INFORMATIONS IMPORTANTES DE SÉCURITÉ Ne JAMAIS regarder le fût du lanceur de paintball avec ou sans vos lunettes de protection. Ne JAMAIS regarder le fût d’un lanceur de paintball qu’il soit chargé ou non. WARNING: UNSAFE Ne JAMAIS viser une personne ou tirer avec votre lanceur sur une personne ne portant pas l’équipement requis pour le paintball et sans les protections pour les YEUX/VISAGE/OREILLES (masque de paintball), spécifiquement conçues pour pratiquer le paintball.
Français ÉQUIPEMENT DE SÉCURITÉ RECOMMANDÉ POUR LE PAINTBALL Casquette ou casque Lunettes de paintball Protège-cou Chandail de paintball avec plastron en dessous Gants de protection Pantalon épais Chaussures de randonnée Utiliser la combinaison appropriée afin d’éviter tout contact avec la peau durant la partie de paintball.
CONSIGNE DE SECURITE SUR LA BOUTEILLE DE CO2/AIR COMPRIME SAFE DAN GER WARNING: UNSAFE La bouteille de CO2 ou d’air comprimé peut partir avec assez de force pour causer des blessures graves ou la mort si la valve se détache de la bouteille. Toujours regarder la valve en devisant la bouteille, en s’assurant que la valve tourne avec la bouteille et ne reste pas sans bouger contre l’adaptateur on/off. Arrêter le démontage si la valve commence à se dévisser de la bouteille.
Français DEMONTER UNE BOUTEILLE DE CO2/AIR COMPRIME Dévisser la bouteille de CO2 ou d’air comprimé de l’adaptateur en tournant dans le sens inverse des aiguilles d’une montre. CONSEIL: Après l’utilisation vous devriez toujours démonter la source de gaz de votre lanceur. Quand la bouteille est démontée de l’adaptateur, un excèdent de gaz est purge par le dessous. PRECAUTION: Ne jamais exposer la peau en dessous de l’adaptateur où se trouve le trou d évacuation lors du démontage.
CHANGEMENT DE CANON ENTRE CHARGEUR ARSENAL ET CHARGEUR TRÉMIE (continuer) récepteur pour un bon ajustement. IMPORTANT: L’adaptateur manchon de Canon est abritant les deux les détentes de billes. Lors du passage du chargeur ou de Magazine, vous devrez peut-être appuyer sur l’avant et l’arrière détente de bille alors qu’ils sont sécurisés à l’adaptateur de manchon de Canon. Cela aidera à prévenir un rouleau de paintball sur le canon. ÉTAPE 4 Resserrer la vis de blocage du canon.
Français NOTE: Ne stockez pas le(s) chargeur(s) chargé(s) de billes pendant une longue période, car la pression du ressort du chargeur entraînera la déformation des billes et le marqueur ne tirera plus correctement. CONSEIL UTILE: L’utilisation de billes plus anciennes stockées pendant une longue période n’est pas recommandée, car elles éclateront prématurément et vos tirs seront peu précis. AVERTISSEMENT POUR LES BILLES FIRST STRIKE™ Le paintball est un sport extrême.
MISE EN GARDE (continuer) • Ne regardez jamais dans le canon à aucun moment que le lanceur soit chargé ou non. • Utiliser un lanceur de paintball en dehors d’une zone faite pour le paintball peut être illégal, et peut être passible de poursuites si des dégâts ont été causés par son utilisateur. BILLE COINCEE DANS LA DESCENTE DE BILLE Dans le cas où une bille exploserait, suivez ce guide afin de décoincer le lanceur.
Français ITP023 REC095 ITP028 REC096 SPR033 ITP027 ORG031 ASA095 SCR019 Noms et des numéros de pièces dans cette section: Power Tube (#ITP027) Power Tube Valve Seat (#ITP028) Power Tube Valve Spring (#SPR033) 13° Rear Body ASA (#ASA095) Hammer 7 Receiver (black/olive green) (#REC095/#REC096) O-ring #112 12.37 (#ORG031) Frame Screw (#SCR019) Cup Seal (#ITP023) DÉPANNER EN CAS DE FUITE D’AIR Dans le canon ou hors du cadre de la gâchette. 1.
LISTE DES PIECES DU SPYDER HAMMER 7™ 1 ASA095 13° Rear Body ASA 26 RPN021 Trigger Roll Pin (large) 2 BAR002 Orange Blaze Rubber Ring 27 SAB004 Safety Button (C) 3 BAR003 Spyder Barrel Plug 28 SCR016 M5 x 12 Screw (A) Frame Screw 4 BAR095 12" Barrel w/STD Thread AR15 Muzzle Brake 29 SCR018 M3 x 8 Screw (+) Grip Panel Screw 5 BAR092 Barrel Sleeve Adapter 30 SCR019 M5 x 28 Screw (A) Frame Screw 6 BLS095 Rubber Ball Stopper 31 SCR048 Feed Neck Clamp Screw & Nut 7 FND080 Polymer V
2 50 3 20 14 9 35 4 39 37 49 10 35 6 20 34 11 5 49 15 28 38 36 8 7 32 42 31 33 27 47 23 24 30 12 46 26 43 29 29 25 17 21 44 13 18 40 19 16 41 45 1 Français SCHÈMAS DU SPYDER HAMMER 7™ 33
POLICE DE GARANTIE Spyder garanti au client original ce produit pour une période de 1 ans à partir de la date d’achat, garantie pièce et main d’œuvre en cas de défaillance sous réserve que le produit est été utilisé dans des conditions normales. Toute pièce électronique dans les lanceurs Spyder électronique est garantie 6 mois à partir de la date d’achat. Spyder accepte de réparer ou remplacer à sa discrétion tout produit dans une période de temps raisonnable.
Distributed by KEE Action Sports / 1-800-PAINTBALL / www.keeactionsports.