
Manual


English
17
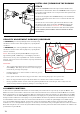
Eko™ CUP SEAL REMOVAL
Part Names and Numbers describe in this section:
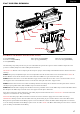
Screw (#SCR016) Eko™ Valve Pin (#ITP026) Eko™ Cup Seal (#ITP023)
Vertical Screw (#SCR037) Valve Spring (#SPR016) Reservoir Plug (#LPC089)
Screw (#SCR057)
The following steps will provide easy access to the Eko™ Cup Seal. The sign of a worn out Eko™ Cup Seal is the
presence of CO2 / Compressed Air leaking down the barrel.
HELPFUL TIP: Do not rush or skip any of the steps for proper disassembly of the Marker. Remove the barrel before
starting.
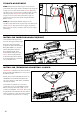
STEP 1 Using a 1/2 inch/13 mm open end or an adjustable wrench to loosen the swivel end of the Hose. NOTE: A
Plastic Washer is inside the female swivel end of the Hose. Make sure you do not lose this part.
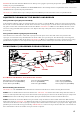
STEP 2 Remove the three screws that hold the Trigger Frame to the Receiver. One screw is located at the rear of
the Trigger Frame. Two additional screws are on the left and right side of the Trigger Frame.
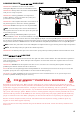
STEP 3 Remove the Vertical Screw that is holding the Reservoir Plug. Once the Reservoir Plug has been removed
the Valve Spring, Eko™ Valve Pin and Eko™ Cup Seal will be attached.
STEP 4 Detach the Valve Spring from the Reservoir Plug, and then unscrew the Eko™ Cup Seal from the Eko™ Valve
Pin. Replace the Eko™ Cup Seal with a new one supplied in the Spare Parts Kit.
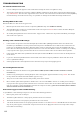
Once these steps have been completed, reassembly all parts back in the Receiver. HELPFUL TIP: Please note how
the parts are removed for easy reassembly.
CAUTION: Use the proper Allen wrenches to fasten all screws and never apply more force than necessary.
IMPORTANT: Always remove the Air Tank before any disassembly of your marker. Do not remove the Eko™ Valve
Body unless specific Eko™ Valve Body repairs are needed. Do not remove the Eko™ Valve Body with a screwdriver
as it will damage the Eko™ Valve Body Lip and cause air leaks. NOTE: The Eko™ Valve Body Screw must be removed
prior to taking out the Eko™ Valve Body.
LPC089
SPR016
ITP023
Swivel End
ITP026
SCR037
SCR057
SCR016