
Manual


16
Reassemble Rear Internals
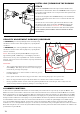
STEP 1 Join both FS Venturi Bolt and Striker Bolt thru the rear of the Receiver with the O-ring on the Striker
Bolt facing towards the front of the Marker. NOTE: When inserting both parts, apply finger pressure behind the FS
Venturi Bolt and at the same time pull on the Trigger to allow entry of the both parts.
STEP 2 Insert the Striker Buffer flush at the lower end of the Receiver and place the Striker Spring thru the Striker
Buffer.
STEP 3 Place the Striker Plug w/Velocity Adjuster & Spring Guide to the rear of the Receiver.
STEP 4 Insert the Disconnect Pin thru the Receiver to secure the Striker Plug in place. WARNING: Before/after
use of the Marker, make sure to fasten all screws. Screws may become loose due to vibration. Loose screws can be
dangerous and cause injury.
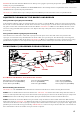
To assure marker is assembled properly, follow the schematic drawing or position parts in order during disassembly.
Parts assembled backwards or improper parts installed will / can cause the marker to malfunction.
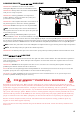
WARNING:
Never attempt to remove the Markers internals while the CO2 / Compressed Air Tank is attached. Make sure to
remove all paintballs and loader before disassembling the marker.
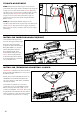
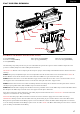
QUAD RIS BARREL SHROUD REMOVAL
STEP 1 Using a 1/2 inch or 13mm open end or and adjusted wrench loosen the Swivel End of the hose.
STEP 2 Remove the Three Screws that hold the Trigger Housing to the Receiver. One the Screw is located at the
rear of the Receiver. The other Two additional Screws are on the Left and Right side of the Trigger Housing.
STEP 3 Once the Trigger Housing is removed from the Receiver, loosen all of the 5 Screws from the Quad RIS Barrel
Shroud. This will allow the both halves to split apart.
HELPFUL TIP: Please note how the parts are removed for easy reassembly.