
Manual


English
15
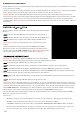
DANGER: Do not look down the Marker barrel. Always wear goggles specifically designed for paintball use while
working on your paintball Marker.
IMPORTANT: Always have the Marker on SAFE MODE before disassembly. Remove all paintballs and air source from
the Marker before performing any maintenance.
HELPFUL TIP: Follow these steps to help clean/remove Marker parts should in the event of a paintball break.
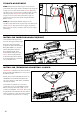
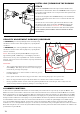
SQUEEGEE CLEANING OF THE BARREL AND BREACH
Using a Stick Squeegee (not included)
If the FS Venturi Bolt is in the un-cocked position you need to re-cock the Marker. Slide a stick squeegee down the
barrel until it reaches the Markers breach. Then remove the stick squeegee out of the barrel. This should wipe clean
any paint residue that could have broken inside the Marker. HELPFUL TIP: Make sure the Markers breach is clean
and clear of any paintball shell fragments or dirt. Repeat this step if the paint residue did not wipe clean after the
first attempt.
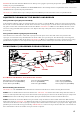
Using a Cable Swab Squeegee (not included)
Twist off the barrel and slide a cable swab squeegee from the open end so the swab is the last portion of the
squeegee out of the barrel tip. Grab hold the tail of the cable squeegee and pull. This should wipe clean any paint
residue that could have broken in the barrel. HELPFUL TIP: Make sure the Markers breach is clean and clear of any
paintball shell fragments or dirt. Repeat this step if the paint residue did not wipe clean after the first attempt.
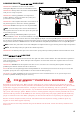
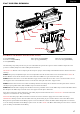
DISASSEMBLE / REASSEMBLE REAR INTERNALS
Part Names and Numbers described in this section:
AR15 Charging Handle (#STK022) FS Venturi Bolt (#VBT090) Striker Bolt (#STB002)
Quick Disconnect Pin (#RPN023) Receiver (#REC090) Striker Spring (#SPR025)
Striker Buffer (#STF001) Striker Plug (#STP089) Velocity Adjuster (#VTA089)
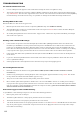
Disassembling the Internals
HELPFUL TIP: The SOPMOD Stock should not be attached to the Receiver when removing Rear Internals.
STEP 1 Pull out the Disconnect Pin from the Receiver. HELPFUL TIP: Remove the Striker Plug while the marker is
in the un-cocked position this will prevent the internals from springing out because the Striker Spring is compressed.
STEP 2 Remove the Striker Plug with the Striker Spring and Striker Buffer out the back of the Receiver.
STEP 3 Tilt back the end of the Marker into your hands ready catch the FS Venturi Bolt and Striker Bolt from the
back of the Receiver. HELPFUL TIP: When the internals are removed it would be wise to clean any dirt or paint from
the inside of the Receiver with a squeegee and wipe the FS Venturi Bolt clean with a rag or paper towel. Apply some
paintball gun oil on Striker O-ring periodically. IMPORTANT: It is not necessary to disassemble the rear internals for
basic maintenance unless the Striker O-ring needs to be replaced.
RPN023
STK022
VBT090
STP089
VTA089
SPR025
STF001
STB002
REC090