
Manual


12
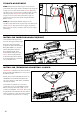
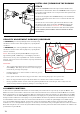
TRIGGER ADJUSTMENT
STEP 1 Adjusting the Top Trigger Screw located
underneath the Trigger Frame clockwise will swing the
Trigger closer to the touch switch. NOTE: Adjusting
the Top Trigger screw counter-clockwise will increase
the trigger gap. IMPORTANT: Over adjusting the
Trigger screw to close won’t allow the trigger to
activate the touch switch which will not allow the
Marker to fire.
STEP 2 Adjusting the Middle Trigger Screw
clockwise will shorten the trigger stop from the touch
switch. NOTE: This will increase trigger sensitivity.
Unscrewing it counter clockwise will decrease trigger
sensitivity.
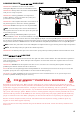
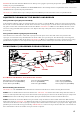
INSTALLING CARRYING HANDLE W/SIGHT
Loosen both Locking Screws
from the Carrying Handle Sight.
Place the Carrying Handle
Sight to fit above the Picatinny
Body Rail. Make sure to align
the Locking Plate with the
Carry Handle Sight. Then
Fasten both Locking Screws.
NOTE: The Carrying Handle
Sight adjusting wheel should
be on the Right side and at the
rear of the Receiver.
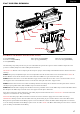
INSTALLING / REMOVING A PAINTBALL LOADER
IMPORTANT: The Barrel must be installed
before loading the Magazine or Force Feed
Paintball Loader.
Attach an Force Feed Paintball Loader to
the Markers Feed Neck and tighten the
set screw. Only use .68 caliber paintballs
through the loader.
Loosen the Feed Neck set screw and
remove the Force Feed Paintball Loader.
When removing the loader make sure to
remove all paintballs. CAUTION: There may
be paintballs in the Markers breach; take a
couple of shots in a safe direction to make
sure the Barrel and Receiver are empty.
1
2