
Manual


10
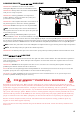
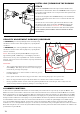
BARREL PLUG TYPE DEVICE
Insert the barrel plug securely into the end of your markers barrel before proceeding to load paintballs and screwing
in your tank to your marker.
The barrel plug should fit firmly into the barrel with a significant amount of resistance. NOTE: The barrel plug should
not be easy to remove and always inspect the O-rings to make sure they are not worn or cut.
IMPORTANT: Remove the Barrel Blocking Device only when you are getting ready to begin play or have been
instructed to do so by a field safety official. Always keep your Barrel Blocking Device on your marker after you have
finished playing. Keep it in place even after you have emptied all paintballs and removed your air tank from your
paintball marker. WARNING: Inspect your Barrel Block Device regularly for wear and any tear if it is worn, replace it
immediately.
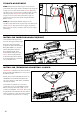
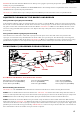
BATTERY IN AL TION
Please consider the environment by using a Rechargeable 9.6volt Spyder
Battery.
1 Remove the three M3x8 Screws from the Left side grip panel.
2 Attach the battery to the battery wire harness Red / Black Wires.
3 Reattach the grip panel and tighten the three M3x8 Screws.
HELPFUL TIP: Please note how the parts are removed for easy reas-
sembly.
Spyder recommends using the Spyder 9.6volt NiMH Rechargeable
Battery as a power source for optimum performance and will provide a
superior shot count of 5000 to 6000 rounds. IMPORTANT: Performance
will vary depending on the mode used and rate of fire achieved.
S
HELPFUL TIP: To charge a Spyder 9.6 NiMH battery, the Circuit Board
must be in the OFF position. Spyder batteries are not fully charged when purchased.
1 Plug the Spyder LED A/C charger into a power outlet.
2 Connect the Spyder A/C charger cord to the rear of the Markers trigger frame’s charging port.
3 The LED indicator on the Spyder LED A/C charger will display RED when the battery is charging.
4 The LED indicator on the Spyder LED A/C charger will display GREEN when the battery is fully charged.
For a complete charge, Spyder recommends a charging time of 6-8 hours.
5 Unplug the Spyder LED A/C charger cord from the rear of the Markers trigger frame’s charging port after
charging.
6 Remove the Spyder LED A/C charger from the power outlet.
IMPORTANT: Never charge the battery for over 24 hours, as you will risk damaging the battery and/or electronics.
HELPFUL TIP: It is recommended that the battery be charged prior to use in order to ensure maximum performance,
especially if the battery has not been used in over a period of time. NOTE: A fully charged Spyder battery will last
about 5000-6000 shots, depending on your firing methods or firing mode in use. Under normal use and charging
conditions the expected life of the Spyder battery is approximately 700-1000 charging cycles.
To avoid any risks of having the Battery explode or the Circuit Board burned: charge only Spyder 9.6volt NiMH
Batteries in Spyder electronic frames.
IMPORTANT
• DO NOT attempt to recharge any Alkaline or any other type of battery in the Spyder electronic frame.
• DO NOT try to recharge batteries that are rusted, corroded, damaged or leaking.
• FAILURE to follow any of the instructions, will VOID ALL WARRANTIES AND LIABILITIES from Spyder.
• Spyder will not be held liable for any injury or damages from the improper use of this product. This acces -
sory is not intended for use with any other product other than what Spyder designed it for.