
Manual


12
English
Eko™ CUP SEAL REMOVAL
Eko™CUP SEAL REMOVAL
The following steps will provide easy access to the Eko™ Cup Seal. The sign of a worn out Eko™ Cup Seal is the
presence of CO2 / Compressed Air leaking down the barrel.
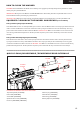
STEP 1 Loosen the M5 x 12 Screw that holds the Reservoir Plug in front of the Foregrip.
STEP 2 Slide the Reservoir Plug out of the Receiver.
STEP 3 Once the Reservoir Plug has been removed the Valve Spring, Eko™ Valve Pin, Eko™ Cup Seal Guide and
Eko™ Cup Seal will be attached.
STEP 4 Detach the Valve Spring from the Reservoir Plug, and then unscrew the Eko™ Cup Seal from the Eko™
Valve Pin. Replace the Eko™ Cup Seal with a new one supplied in the Spare Parts Kit.
STEP 5 Detach the Valve Spring from the Vertical Adapter, and then unscrew the Eko™ Cup Seal from the Eko™
Valve Pin. Replace the Eko™ Cup Seal with a new one supplied in the Spare Parts Kit.
Once these steps have been completed, replace the damaged Eko™ Cup Seal and reassembly all parts back in the
Receiver. HELPFUL TIP: Please note how the parts are removed for easy reassembly.
CAUTION: Use the proper Allen wrenches to fasten all screws and never apply more force than necessary.
IMPORTANT: Always remove the Air Tank before any disassembly of your marker. Do not remove the Eko™ Valve Body
unless specific Eko™ Valve Body repairs are needed. Do not remove the Eko™ Valve Body with a screwdriver as it will
damage the Eko™ Valve Body Lip and cause air leaks. NOTE: The Eko™ Valve Body Screw screw must be removed prior to
taking out the Eko™ Valve Body.
Part Names and Numbers describe in this section:
Screw (#SCR016)
Eko™ Valve Pin (#ITP026)
Eko™ Cup Seal (#ITP023)
Valve Spring (#SPR024)
Reservoir Plug (#LPC080)
Eko™ Valve Pin (#ITP026)
ITP026
SCR016
ITP023
SPRO24
LPC080