.68 CAL SEMI-AUTO MARKER USER MANUAL English Français
English ™ .
IMPORTANT SAF Y GUIDELIN WARNING • • • • • • • • • • • • • • • • • • • • • • • 1 This paintball marker is NOT a toy. Misuse can cause serious injury or death. Spyder recommends that the customer be at least 18 years of age to purchase this product. Person under 18 years of age must have adult supervision when using this product. Read this User manual before using this product.
English OPERATION GUIDE / START UP 1. 2. Always attach a barrel blocking device over the tip of the barrel for safety precautions when not shooting/playing. Have the marker in the “SAFE” position before use. To operate, push the safety button from the “PUSH SAFE” side of the trigger frame. This will position the marker in a lock safe mode. To disengage the safety button in a safely manner, point the marker in a safe direction, and push the safety button towards the opposite side of the trigger frame.
8 STEPS TO START AND PLAY IMPORTANT: Please read the Safety and Operation Guidelines before you start the 8 quick steps to Start and Play. 1. Make sure the safety is ON 3. Install a CO2/Compressed air tank 3 2. Insert the barrel blocking device 4.
English 5. Put on your paintball goggles and cock back the marker 7. Unlock the safety 6. Remove the barrel blocking device 8. Ready to play fire IMPORTANT: Make sure the Marker is in the SAFE MODE and the barrel blocking device is on the Marker’s barrel after PLAY.
NEVER look down the barrel with or without your paintball goggles ON. NEVER look down the barrel of a loaded or unloaded marker. WARNING: UNSAFE NEVER shoot or point your marker at a person that is not in a designated paintball facility and without proper EYES/FACE/ EARS protection designed specifically for the sport of paintball. WARNING: UNSAFE Before / after use of the paintball marker, check and make sure all screws are securely tightened.
RECOMMENDED PAINTBALL SAFETY GEAR Cap or Hood Paintball Goggles Neck Protector Paintball Jersey w/ Body Armor under Protective Gloves Padded Pants Athletic Shoes Wear appropriate dress attire to avoid any exposed skin when playing paintball. We recommend purchasing a Paintball Goggles, Neck Protector, Paintball Jersey or Long Sleeve shirt, Body Armor, Protective Gloves, Athletic Shoes and Padded Pants.
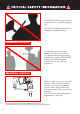
CO2 / COMPRESSED AIR TANK WARNINGS WARNING:UNSAFE SAFE DANG E R The CO2 or Compressed Air Tank can fly off with enough force to cause serious injury or death if the Valve unscrews from the cylinder head. LOOK at the Valve when removing the cylinder from the marker. Be sure that the valve is turning with the cylinder rather than remaining stationary with the marker. STOP if the Valve starts to unscrew from the cylinder.
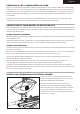
English REMOVING A CO2 / COMPRESSED AIR TANK Firmly unscrew the CO2 / Compressed Air Tank by turning the tank counter-clockwise until it comes out of the C/A Adapter. HELPFUL TIP: After firing the marker, you should ALWAYS remove the CO2 / Compressed Air Tank before storing. When the tank is being removed, excess air will release from the C/A Adapter. CAUTION: Never expose any skin to the C/A Adapters bleed hole when removing the tank. This is to avoid the risk of getting skin burn from the escaping GAS.
INSTALLING / REMOVING A SHOULDER STOCK Place the Shoulder Stock in the top breach of the Receiver behind the Delrin Bolt. Once the Shoulder Stock is in place secure the Stock with the set screw provided, then tighten with the Allen wrench. To adjust the length of the Shoulder Stock press and hold the Lever for adjustment. Once the Lever is released this will lock into position. Loosen the set screw on the right side of the Receiver with the Allen wrench.
English HOW TO CLEAN THE MARKER DANGER: Do not look down the Marker barrel. Always wear goggles specifically designed for paintball use while working on your paintball Marker. IMPORTANT: Always have the Marker on SAFE MODE before disassembly. Remove all paintballs and air source from the Marker before performing any maintenance. HELPFUL TIP: Follow these steps to help clean/remove Marker parts should in the event of a paintball break.
Quick Clean Disassemble Lift upward on the Top Cocking knob. This will allow the Delrin Bolt sliding from the rear of the Receiver. HELPFUL TIP: With the Delrin Bolt removed out of the Receiver, this allows easy access to clean with a squeegee. NOTE: Make sure the hole on the Striker Bolt is facing upright when looking thru the Receiver. This will allow the Top Cocking Knob to correctly fasten with the Striker Bolt.
English Eko™ CUP SEAL REMOVAL SPRO24 ITP026 SCR016 ITP023 LPC080 Part Names and Numbers describe in this section: Screw (#SCR016) Eko™ Valve Pin (#ITP026) Eko™ Cup Seal (#ITP023) Valve Spring (#SPR024) Reservoir Plug (#LPC080) Eko™ Valve Pin (#ITP026) Eko™CUP SEAL REMOVAL The following steps will provide easy access to the Eko™ Cup Seal. The sign of a worn out Eko™ Cup Seal is the presence of CO2 / Compressed Air leaking down the barrel.
Air Leak From The Hose Line 1. If air is leaking from the opposite ends of the hose fittings will need to retighten to snug. 2. The female end of the hose must have a Plastic Washer installed inside the Hose collar and be tightened properly. IMPORTANT: The Hose line supplied has metric female ends. This will not install into American 1/8” (NPT) threaded fittings. If installed incorrectly, it is possible to damage the attachment fittings and hose line. 3.
English WARRANTY ATEMENT Spyder warrants the original retail purchaser that this product is free from defects in material and workmanship under normal use and service for a period of (1) year from the original date of purchase. Any Electronic Components in an Electronic Spyder marker are warranted for (6) months from the original date of purchase. Spyder agrees to repair or replace (at its discretion) any product within (a reasonable period of time).
MR100 PRO PARTS LIST ASA036 BAR001 BAR047 C/A Adapter Angled (diamond black) Spyder Barrel Plug 1PCS MR100 Barrel (diamond black) BLS037 Rubber Ball Stopper BLS038 Detent Cover (plastic curve) FND080 Feed Neck 2012 (plastic) FRG080 Gas Thru Foregrip MR100 GRP004 Rubber Grip Cover 12 (black) HSE003 Disconnect Hose 8.
English MR100 PRO SCHEMATICS TRIGGER STP046 RPN005 SABOO2 ORGOO8 SER002 RPN004 RPN006 VTAO46 SPR008 SPR011 STF001 VBT013 VBT004 SPR025 VBT003 STK019 STB002 VBT080 RPN016 ORG001 SCR032 SCR046 SCR002 STK020 BLS038 ASA036 SCR016 ITP015 GRP004 SCR019 BLS037 SCR049 SCR048 SCR046 SCR007 TRF004 ORG004 HSF006 TRS003 HSF004 SCR016 HSF011 FND080 HSE003 REC080 REC081 SCR049 SCR016 ORG004 ORG002 ORG003 ITP025 FRG080 ORG002 SCR002 ITP026 ITP023 SPR024 BAR047 ORG002 LPC080 BAR047 16
Français ™ Marqueur De Paintball Semi Automatique De Calibre .
IMPORTANT CONSIGN DE SECURITE WARNING • • • • • • • • • • • • • • • • • • • • • • • 17 Ce marqueur de paintball n’est PAS un jouet. Une mauvaise utilisation peut entraîner des blessures graves ou la mort. Spyder recommande que le client ait au moins 18 ans pour acheter ce produit. Les personnes de moins de 18 ans doivent être surveillées par un adulte lorsqu’elles utilisent ce produit. Veuillez lire ce manuel de l’utilisateur avant d’utiliser ce produit.
Français IMPORTANTES CONSIGNES DE SECURITE / MISE EN ROUTE 1. Par mesure de sécurité, fixez toujours un dispositif de blocage du canon au bout de celui-ci lorsque vous ne tirez/jouez pas. 2. Mettez le marqueur en position « SECURITE » avant de l’utiliser. Pour utiliser le marqueur, enfoncez le bouton de sécurité du côté « PUSH SAFE » du cadre de la gâchette. Ceci positionnera le marqueur en mode sécurité verrouillée.
8 ÉTAPES POUR COMMENCER À JOUER IMPORTANT: Lire les recommandations de sécurité et de fonctionnement avant de suivre les 8 étapes rapides pour commencer à jouer. 1. Assurez-vous que la sécurité soit sur ON 3. Installez une bouteille de CO2 / d’air comprimé 19 2. Insérez le dispositif de blocage du canon 4.
Français 5. 6. Mettez vos lunettes de paintball et Retirez le dispositif de blocage du armez le marqueur canon 7. Déverrouillez la sécurité 8. Prêt à jouer et tirer IMPORTANT: S’assurer que le marqueur est en MODE SÉCURITÉ et que le dispositif de blocage du canon est bien en place sur le marqueur après avoir JOUÉ.
INFORMATIONS IMPORTANTES DE SÉCURITÉ Ne JAMAIS regarder le fût du lanceur de paintball avec ou sans vos lunettes de protection. Ne JAMAIS regarder le fût d’un lanceur de paintball qu’il soit chargé ou non. WARNING: UNSAFE Ne JAMAIS viser une personne ou tirer avec votre lanceur sur une personne ne portant pas l’équipement requis pour le paintball et sans les protections pour les YEUX/VISAGE/ OREILLES (masque de paintball), spécifiquement conçues pour pratiquer le paintball.
ÉQUIPEMENT DE SÉCURITÉ RECOMMANDÉ POUR LE PAINTBALL Casquette ou casque Lunettes de paintball Protège-cou Chandail de paintball avec plastron en dessous Gants de protection Pantalon épais Chaussures de randonnée Utiliser la combinaison appropriée afin d’éviter tout contact avec la peau durant la partie de paintball.
CONSIGNE DE SECURITE SUR LA BOUTEILLE DE CO2/AIR COMPRIME SAFE WARNING:UNSAFE DANG E R La bouteille de CO2 ou d’air comprimé peut partir avec assez de force pour causer des blessures graves ou la mort si la valve se détache de la bouteille. Toujours regarder la valve en devisant la bouteille, en s’assurant que la valve tourne avec la bouteille et ne reste pas sans bouger contre l’adaptateur on/off. Arrêter le démontage si la valve commence à se dévisser de la bouteille.
Français DEMONTER UNE BOUTEILLE DE CO2/AIR COMPRIME Dévisser la bouteille de CO2 ou d’air comprimé de l’adaptateur en tournant dans le sens inverse des aiguilles d’une montre. CONSEIL: Après l’utilisation vous devriez toujours démonter la source de gaz de votre lanceur. Quand la bouteille est démontée de l’adaptateur, un excèdent de gaz est purge par le dessous. PRECAUTION: Ne jamais exposer la peau en dessous de l’adaptateur où se trouve le trou d évacuation lors du démontage.
INSTALLATION / RETRAIT D’UNE CROSSE D’ÉPAULE Pour AUGMENTER la vélocité FPS (feet per second = pieds par seconde) utilisez la clef six pans et tournez la pièce VELOCITY ADJUSTER/SPRING GUIDE) dans le sens des aiguilles d’une montre. Poignée de presse pour l’ajustement Pour DIMINUER la vélocité, tournez dans le sens inverse des aiguilles d’une montre.
Français Si vous n’arrivez toujours pas par ce moyen à décoincer la culasse, une autre méthode consiste a prendre une tige vous n’arrivez toujours pas par ce moyen à décoincer la culasse, une autre méthode consiste a prendre une tige de nettoyage droite et rigide ou bien une tige en bois et pousser la culasse vers l’arrière en poussant avec la tige depuis l’avant du lanceur en faisant attention que la surface en contact avec le devant de la culasse soit plat pour ne pas endommager la culasse ou l’alésage du
Demontage Pour Nettoyage Rapide Tirez la goupille de réarmement vers le haut, cela permettra à la culasse en Delrin de coulisser par l’arrière du lanceur. Le Bolt Delrin étant enlevé cela permet l’accès à un squeegee pour nettoyer le lanceur. NOTE: Le trou situé sur le cote du marteau (Striker Bolt) doit toujours être situe vers le haut du lanceur .Vous devez pouvoir le voir depuis le haut du lanceur. Cela permet à la goupille de réarmement de venir se loger dedans quand vous remonterez la culasse.
Français GUIDE DE DEMONTAGE DU Eko™ CUP SEAL SPRO24 ITP026 SCR016 ITP023 LPC080 Noms des pièces et référence décris dans ce chapitre: Screw (#SCR016) Eko™ Valve Pin (#ITP026) Eko™ Cup Seal (#ITP023) Valve Spring (#SPR024) Reservoir Plug (#LPC080) Eko™ Valve Pin (#ITP026) GUIDE DE DEMONTAGE DU Eko™ CUP SEAL Les étapes suivantes vous permettrons d’accéder facilement au « Eko™ Cup Seal ». Une fuite d’air ou de CO2 au canon est le signe d’ un « Eko™ Cup Seal » abîmé.
FUITE D’AIR DU TUYAU 1. Si la fuite d’air se situe à l’extrémité opposée du tuyau, les raccords auront besoin d’être resserrés pour être bien ajustés. 2. L’extrémité femelle du tuyau doit être équipée d’une rondelle en plastique à l’intérieur du collier de serrage et doit être bien serrée. IMPORTANT : Le tuyau fourni a des extrémités femelles métriques. Il ne sera pas possible de le brancher à un raccord fileté américain 1/8” (NPT).
Français POLICE DE GARANTIE Spyder garanti au client original ce produit pour une période de 1 ans à partir de la date d’achat, garantie pièce et main d’œuvre en cas de défaillance sous réserve que le produit est été utilisé dans des conditions normales. Toute pièce électronique dans les lanceurs Spyder électronique est garantie 6 mois à partir de la date d’achat. Spyder accepte de réparer ou remplacer à sa discrétion tout produit dans une période de temps raisonnable.
LISTE DES PIECES DU SPYDER MR100 PRO ASA036 BAR001 BAR047 C/A Adapter Angled (diamond black) Spyder Barrel Plug 1PCS MR100 Barrel (diamond black) BLS037 Rubber Ball Stopper BLS038 Detent Cover (plastic curve) FND080 Feed Neck 2012 (plastic) FRG080 Gas Thru Foregrip MR100 GRP004 Rubber Grip Cover 12 (black) HSE003 Disconnect Hose 8.
Français SCHÈMAS DU SPYDER MR100 PRO TRIGGER STP046 RPN005 SABOO2 ORGOO8 SER002 RPN004 RPN006 VTAO46 SPR008 SPR011 STF001 VBT013 VBT004 SPR025 VBT003 STK019 STB002 VBT080 RPN016 ORG001 SCR032 SCR046 SCR002 BLS038 ASA036 SCR016 ITP015 GRP004 SCR019 BLS037 SCR049 SCR048 SCR046 SCR007 TRF004 ORG004 HSF006 TRS003 HSF004 SCR016 HSF011 FND080 HSE003 REC080 REC081 SCR049 SCR016 ORG004 ORG002 ORG003 ITP025 FRG080 ORG002 SCR002 ITP026 ITP023 SPR024 BAR047 ORG002 LPC080 BAR047 32
Distributed by KEE Action Sports / 1-800-PAINTBALL / www.keeactionsports.