
Manual


12
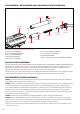
CUP SEAL REMOVAL
STEP BY STEP CUP SEAL ACCESS
Access of the cup seal for service or replacement requires the removal of the Front Plug and Vertical CA Adapter.
STEP 1 Unscrew the Foregrip Expansion Chamber from the Vertical CA Adapter.
STEP 2 Remove the Vertical CA Adapter by unscrewing the Vertical CA Adapter Mounting Screw, be sure to keep a
nger over the Front Plug to prevent it from springing out. NOTE: The Front Plug and Vertical CA Adapter are both
held in place by the Vertical CA Adapter Mounting Screw.
STEP 3 Pull the Front Plug out and it should come out with the Valve Spring, Cup Seal Guide, Cup Seal and Valve
Pin all together.
STEP 4 Unscrew the Cup Seal from the Valve Pin and replace with the spare provided with your spare parts kit.
STEP 5 Follow the previous steps in reverse to re-install all components properly. Make sure the Front Plug screw
hole is lined up with the vertical adapter screw hole.
IMPORTANT: Always make sure all air sources have been removed from your marker and any residual air has been
vented out completely before servicing your marker.
NOTE: Service or replacement of the Cup Seal should only be done if a leak is present and can be heard from the
breach after the removal of the Delrin Bolt.
Part Names and Numbers describe in this section:
Foregrip Expansion Chamber (#FRG026/FRG033)
Cup Seal Guide (#ITP011)
Cup Seal (#ITP012)
Valve Pin (#ITP017)
M5x20 Vertical Washer (# ITP019)
Front Plug (#LPC026/LPC033)
Valve Spring (#SPR013)
Vertical Adapter (#VRT026/VRT033)
Vertical Adapter Mounting Screw (#SCR027)
English
LPC026
LPC033
SPR013
ITP011
ITP012
ITP017
VRT026
VRT033
FRG026
FRG033
SCR027
ITP019