OWNER'S MANUAL 900MHz Digital Cordless Phone with Call Waiting Caller ID National Help Desk Call Sprint TOLL FREE AT 1-800-949-4357
TABLE OF CONTENTS PARTS CHECKLIST .................................................................................... 1 FCC REGULATIONS ................................................................................... 2 IMPORTANT SAFETY INSTRUCTIONS ...................................................... 4 GETTING STARTED ................................................................................... 6 WALL MOUNTING ......................................................................................
TABLE OF CONTENTS Making Directory Calls ................................................................................ 17 Editing a Directory Entry ............................................................................. 17 Erasing a Directory Entry ............................................................................ 18 Programming Speed Dial Numbers in the Base Unit .................................... 18 Speed Dialing from the Base Unit .....................................................
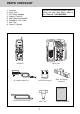
PARTS CHECKLIST 1. 2. 3. 4. 5. 6. 7. 8. To purchase replacement battery packs, please visit your local Sprint store or call VTech at 1-800-624-5688.
FCC Regulations provide reasonable protection against harmful interference in a residential installation. This equipment generates, uses and can radiate radio frequency energy and, if not installed and used in accordance with the instructions, may cause harmful interference to radio communications. However, there is no guarantee that interference will not occur in a particular installation.
FCC Regulations that could affect the operation of your equipment. If so, you will be given advance notice of the change to give you an opportunity to maintain uninterrupted service. The base unit contains no user serviceable parts. The handset contains a user replaceable battery pack. If it is determined that your telephone equipment is malfunctioning, the FCC requires that it not be used and that it be unplugged from the modular jack until the problem has been corrected.
IMPORTANT SAFETY INSTRUCTIONS When using your telephone equipment, basic safety precautions should always be followed to reduce the risk of fire, electric shock and injury to persons, including the following: 1. Read and instructions. understand all 2. Follow all warnings and instructions marked on the product. 3. Unplug this product from the wall outlet before cleaning. Do not use liquid cleaners or aerosol cleaners. Use a dry cloth for cleaning. 4.
IMPORTANT SAFETY INSTRUCTIONS CAUTION: TO REDUCE THE RISK OF FIRE OR INJURY TO PERSONS BY BATTERY, READ AND FOLLOW THESE INSTRUCTIONS. C. If the product has been exposed to rain or water. D. If the product does not operate normally by following the operating instructions.
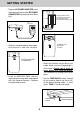
GETTING STARTED • Plug the AC POWER ADAPTER into a live electrical outlet and the DC POWER CONNECTOR into the back of the Base Unit. PLEASE NOTE THE CORRECT POSITION OF THE BATTERY PACK WHEN INSTALLING AC OUTLET 9V DC TEL.LINE SLIDE IN THE BATTERY COVER • Slide the Handset battery cover down, and remove it from the Handset. PRESS and SLIDE DOWNWARD • Place the Handset into the Base Unit cradle. Make sure the Charging light is illuminated. Charge for at least 16 hours before first using the phone.
GETTING STARTED • After charging the battery pack, connect the telephone line cord to a live telephone outlet and the TEL. LINE jack, located on the back edge of the Base Unit. • If your Base Unit is not connected to a live telephone outlet, the Handset will display: CHECK TEL. LINE 9V DC TEL.LINE For best results, raise the antenna on the Base Unit and Handset when using the phone.
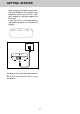
WALL MOUNTING The Wall Mounting bracket is designed to fit on standard Wall Mounting plates 1. Choose a spot near an electrical outlet and a telephone jack. Your phone requires a modular telephone jack and a standard electrical outlet (120v AC). The power cord is six feet long; make sure there is an electrical outlet within reach of the Base Unit. The outlet should not be controlled by a wall switch. If the switch is ever turned off, the phone will not operate. BASE UNIT WALL MOUNT 2.
HANDSET UNIT KEYS AND FEATURES ANTENNA VOLUME UP & DOWN HEADSET JACK BATTERY COMPARTMENT CHRISTOPHER DOW 1-123-456-7890 Select PHONE Speaker Flash Flash ABC GHI PQRS OFF DEF JKL MNO TUV WXYZ OPER Mute/ Hold Return Call Intercom Program Repeat Dial Redial/ Pause 3-Way Call DISPLAY BACK FORWARD SELECT OFF KEY SPEAKER PHONE DIALING KEYS (0-9, ,#) * INTERCOM PROGRAM REDIAL/PAUSE 3-WAY CALL REPEAT DIAL RETURN CALL MUTE/HOLD TONE KEY (Temporary Tone) 9
BASE UNIT KEYS AND FEATURES ANTENNA LINE IN USE INDICATOR CHARGING INDICATOR SPARE BATTERY INDICATOR VOICE MAIL INDICATOR REDIAL/PAUSE PROGRAM HOLD MUTE MEMORY SPEAKERPHONE INTERCOM VOLUME UP VOLUME DOWN FLASH RINGER OFF LOW HI BASE RINGER SWITCH PULSE TONE TONE/PULSE SWITCH 9V DC TEL.
BASIC TELEPHONE OPERATIONS • Press until the desired location is blinking (#1…..#5). • Press Select . ENTER AREA CODE is displayed. • Enter a “local” area code. • Press Select. AREA CODE PROGRAMMING To benefit from all the Caller ID features of your telephone, you must enter your home area code. If you live in an area where you dial calls within your own area code by dialing 7 digits (no area code), follow these steps (with the Handset OFF ): • Press Program. until AREA is blinking. • Press • Press Select.
BASIC TELEPHONE OPERATIONS REDIAL/PAUSE Press PHONE or the Handset Speaker key. Press Redial/Pause. The last number you called will be redialed. HANDSET VOLUME CONTROL ANSWERING CALLS Handset: Press PHONE. TALK is displayed on the Handset. Press OFF to end your call. Cordless Speakerphone : Press Speaker on the Handset. The Handset answers the call as a cordless speakerphone. You can hold it in your hand or place it standing up on a table. To end a call, press OFF.
BASIC TELEPHONE OPERATIONS Voice Mail Tips: After hearing your messages, wait until the Voice Mail indicators turn off before you make another call. This will ensure the indicators do not remain on after the messages are reviewed. PAGING THE HANDSET •To make the Handset ring, press Intercom on the Base. •To stop the ringing, press OFF on the Handset. INTERCOM (Conversation between the Base and Handset) From the Handset: Press Intercom.
BASIC TELEPHONE OPERATIONS CALLER ID •Press until RINGER is blinking. •Press Select. •Press until VOL is blinking. •Press Select. or to raise or lower the •Press ringer volume. •When the desired setting is blinking, press Select. This telephone provides three types of Caller ID: Caller ID: Displays the name and number of each caller after the phone begins ringing (requires Caller ID service from your telephone company).
CALLER ID If you want the phone to announce names, you must record some spoken names with the numbers in your Directory. See the section “DIRECTORY:TO STORE A NAME, NUMBER, AND VOICE ANNOUNCE RECORDING”. (x3 for example) it indicates the party has called more than once. JOHN SMITH 123-4567 x3 ERASING CALLS To erase a call; with the Handset OFF: or until you see the call • Press you want to erase. • Press Select. • Press until ERASE is blinking. Press Select. • Press until YES is blinking.
DIRECTORY blinking. • Press Select. The Handset will beep and turn off automatically. When the name is complete, press Select.The screen will display: DEAN You can store the names and phone numbers of up to 50 frequently called people. Each name can be up to 16 characters. Each phone number can be up to 32 digits. ENTER NUMBER Enter the phone number. Press Redial/ Pause if you need to enter a 2-second pause in the dialing sequence.
DIRECTORY Press Select while YES is blinking. To make a new recording of the name: Press until REDO is blinking. Press Select. Speak after the beep. You can re-record as many times as you want. Each time you re-record or review the name, the Handset shows: RECORD NAME? YES NO You will then hear a long beep. The name and number have been stored in the Directory. If you want to record this person’s name for Voice Announce Caller ID, you will need to edit the entry and add a recording at that time.
DIRECTORY The handset displays several options that let you hear the recorded name or or re-record or erase it. Press until the desired option is blinking. Press Select . ERASING A DIRECTORY ENTRY • Press Select . or to scroll to the desired • Press name; or, search by entering the first letter of the name, and then press or if necessary. • Press Select . until ERASE is blinking. • Press • Press Select. Press until YES is blinking. • Press Select .
HEADSET OPERATIONS Your Sprint cordless phone is equipped with a 2.5mm Headset Jack for use with an optional accessory Headset for hands-free operation. For maximum sound quality, the flexible microphone should be positioned at the corner of your mouth, about one inch from your face. If you choose to use the Headset option, you must obtain an optional accessory Headset, which is compatible with the Sprint cordless phone.
ADDITIONAL OPERATIONS people. Press 3-Way Call again to drop the last person. Press OFF to end your call. PAY PER USE FUNCTIONS The Handset provides 3 keys that give you easy access to convenient custom features: Return Call Repeat Dial 3-Way Call POWER BACKUP When the second battery is installed in the Base Unit, your Sprint cordless telephone uses this battery to provide operational backup during a power failure.
MAINTENANCE Taking Care Of Your Telephone Your SP1933 cordless telephone contains sophisticated electronic parts, so it must be treated with care. Avoid rough treatment Please the Handset down gently. Save the original packing materials to protect your telephone if you ever need to ship it. Avoid water Your telephone can be damaged if it gets wet. Do not use the Handset outdoors in the rain,or handle it with wet hands. Do not install your Base Unit near a sink, bathtub or shower.
IN CASE OF DIFFICULTY THE HANDSET DOES NOT RING WHEN YOU RECEIVE A CALL. • Make sure you have the handset ringer activated. To set the ringer, see "HANDSET RINGER VOLUME". • Make sure the telephone line cord is plugged firmly into the base unit and the telephone jack. Make sure the power cord is plugged in. • You may be too far from the base unit. • You may have too many extension phones on your telephone line to allow all of them to ring. Try unplugging some of the other phones.
IN CASE OF DIFFICULTY 7. Install the base unit battery pack, where applicable. 8. Place the handset in the base unit cradle. If the handset has not been recently charged, allow 8 hours before use.
WARRANTY LIMITED WARRANTY The Manufacturer's Limited Warranty, to the original purchaser only, the material and workmanship of this product for ONE YEAR from the date of purchase. The manufacturer will repair or replace, at our option, this product without charge should it fail due to a defect in material or workmanship within that time period. This warranty does not apply to loss or damage which is the result of accident, misuse or negligence.
TECHNICAL SPECIFICATIONS FREQUENCY CONTROL Crystal Controlled Dual PLL Synthesizer WEIGHT Handset : 205 grams Base : 570 grams TRANSMIT FREQUENCY Handset : 923.10 MHz to 927.75 MHz ( All 30 channels within this range) POWER REQUIREMENTS Handset : Self-contained nickel-cadmium rechargeable battery supply, 3.6V nominal, 600mAh capacity. Base : 902.3 MHz to 906.65 MHz (All 30 channels within this range) Base: 9VDC @ 500mA RECEIVE FREQUENCY Handset : 902.3 MHz to 906.
Printed in China 91-xxxx-10-00 ISSUE 0