Manual (Ver. 1.
1 Before you get started ..............................................................................5 1.1 1.2 1.3 1.4 1.5 1.6 Content of this package .......................................................................................5 System requirements............................................................................................5 Supported clients .................................................................................................6 Supported network protocols.........
5.2.5 Help............................................................................................................55 6 Troubleshooting Guide ...........................................................................57 7 Appendix A ..............................................................................................58 8 Appendix B ..............................................................................................
Copyright (c) 2004 Open-E GmbH. All rights reserved. No part of this publication may be reproduced, stored in a retrieval system, or transmitted in any form, by any means, electronic, mechanical, photo-copying, recording or otherwise, without the prior written consent of Open-E GmbH, Lindberghstr. 5, 82178 Puchheim, Germany. Trademarks Open-E and Open-E iSCSI logos are all registered trademarks of Open-E GmbH.
1 Before you get started Congratulations on purchasing Open-E iSCSI, the ideal solution for network-based storage management. This manual will assist you as you install and configure the hardware. In order to quickly reach the desired configuration, please read the following pages thoroughly. The time invested is well spent - after all, you have purchased this solution for your invaluable data. 1.
1.3 Supported clients • • • • Microsoft Windows (all versions) Linux Unix Mac OS 8.0, 9.0 and MAC OS X 1.4 Supported network protocols • • TCP/IP SNMP 1.5 Required tools Grounding strap or mat in order to avoid electrostatic discharge (ESD) Tools for opening the computer's enclosure (typically, a screwdriver) 1.6 Safety precautions 1.6.1 Personal safety High voltages may occur inside computer equipment. Before removing the enclosure, please turn off the power switch and disconnect the power cords.
2 Features 2.1 What is iSCSI? iSCSI (internet SCSI) is a protocol that encapsulates SCSI (Small Computer System Interface) commands and data in TCP/IP packets for linking storage devices with servers over common IP infrastructures. By using iSCSI, you can supply high performance SANs (Storage Area Networks) using standard IP networks like LAN, MAN, WAN or the Internet. iSCSI solutions are based on a separate operating system and often also on a special hardware.
• • Lower costs by centralizing storage management. iSCSI also simplifies the installation and on-going management of a SAN versus using Fibre Channel. With Open-E iSCSI, you can add storage to your existing network quickly, easily, and most important cost-efficiently. Expensive hardware is no longer necessary. Take any computer, a new rack server or an old desktop PC and exchange the system drive for the Open-E iSCSI flash module.
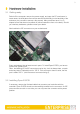
3 Hardware installation 3.1 Getting ready Switch off the computer, remove the power supply, and open the PC's enclosure. In tower cases, the side parts often can be removed individually (on the backside of the enclosure you just need to remove a few screws). Many machines have U- or O shaped covers that have to be pulled off (either towards the front or the back). Should you need any assistance, please contact your dealer.
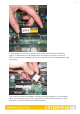
In the package you will find an adapter cable, which provides Open-E iSCSI with power. The little white plug corresponds with the matching connector on Open-E iSCSI. As a final step, the adapter has to be connected to the white power-supply plug (see photo): That should conclude the installation! Before putting the enclosure on your computer again, do not forget to connect your hard drives to the IDE second connector, SATA connector or to the SATA port on the RAID controller.
4 Configuration 4.1 The basic configuration of the iSCSI computer Connect your keyboard and a monitor to the iSCSI computer. You will only need those devices for the basic configuration or extended maintenance configuration. You may have to change the function “Halt On: All Errors” in your PC's BIOS, so that the system starts even without the keyboard. The correct configuration is “Halt On: All But Keyboard.” 4.2 First-time operation of Open-E iSCSI Now start your system.
If the network has a DHCP server, Open-E iSCSI should gain access to the IP settings automatically. If that is the case, you can proceed at 3.5. If your network does not have a DHCP server, Open-E iSCSI will start with the default settings: IP address 192.168.0.220 and subnet mask 255.255.255.0. You can change these values again by typing in the following key combination: left CTRL, left ALT and N. You can select a different IP address now.
Page with the software agreement and available language option will be shown after first launching Open-E iSCSI. Later you can change the language using Language Settings, which are located in server through Setup. After accepting license agreement you can log into Open-E iSCSI Target using the standard password “ancom” (this can be changed later). In order to start working, you can now set all parameters. Password checking is case-sensitive.
4.4 Create RAID Units Use the RAID manager to build a disk array, when a hardware RAID controller is installed in Open-E iSCSI. To create disk arrays utilize 3ware RAID manager (3DM or 3DM2) for RAID controllers series 7000/8000/9000. Use an ICP console for INTEL / ICP Vortex RAID controllers. For any additional information refer to a RAID controller user manual. You can use also storage devices connected to a Fibre Channel.
4.5 Adding Disk Units Please select “setup” Æ “target manager” and then “volumes” on the left page. After selecting “volumes” you will find a list of all logical units. To add a new unit to the iSCSI, please click “Add”. After the initializing procedure, the status of the unit will change from the “Add” button into “in use, vg0”. Please note that you can expand the storage capacity by adding new disk drives. In the “Unit Manager” Function Open-E iSCSI will show both “in use” and “new units”.
Here you can also set the snapshots number, and add them to the particular „targets volume”.
After creating “tgv” and “snapshots” click on the branch “targets” in Target Volume Manager Function, where you add “targets volumes” only in the premises of one vg0. Next, by clickling “CHAP user” on the branch, you can management the name and secure access to “tgv” by giving CHAP user name and password (password must consist from 12 to 16 characters if you use Microsoft iSCSI Initiator). 4.
How to connect iSCSI in Windows 2000/XP/2003: a. First, you have to install the iSCSI Initiator package. You must be logged in as b. c. d. e. f. g. h. i.
5 Description of functions 5.1 Functions of the console display While Open-E iSCSI can be fully administered remotely through a secure Web interface, some of the functions you can access on the console. Open-E iSCSI constantly displays following basic parameters: • • IP address Https settings CTRL+ALT+n If you press the left CTRL key + the left ALT key + n, you will be asked for the new IP address and the subnet mask. The DHCP server will be shut down.
F1, F2 and F5 Function key F1 is available to display help information while F5 will reset the console display to default. If you press F2 key all network interface information will be displayed. Shutting down and restarting With Ctrl + ALT + DEL the Open-E iSCSI host computer will be shut down and restart, while CTRL + ALT + S shut it down. Please be careful with this option when users are connected. 5.
Function “Language Settings” English and German are supported. 5.2.1.2 Network In this place you can find functions helpful in management of nets parameters Open-E iSCSI system.
Function “IP address” Here you can set TCP/IP parameters for selected NIC. You can activate or deactivate network interface by setting "Activate" checkbox. You can use static or dynamic(DHCP) network interface configuration. If you want to dynamically get DNS address, select "get DNS". When using static configuration of network interface, enter address IP, netmask, broadcast and gateway.
Transmit based on [(source MAC address XOR'd with destination MAC address) modulo slave count]. This selects the same slave for each destination MAC address. This mode provides load balancing and fault tolerance. This mode provides fault tolerance and load balancing. • broadcast Transmits everything on all slave interfaces. This mode provides fault tolerance. • 802.3ad IEEE 802.3ad Dynamic link aggregation. Creates aggregation groups that share the same speed and duplex settings.
Function “Administrator Password” Using this function, you can change the password for Open-E iSCSI administrator. For security reasons, please make sure you change the standard password and select a new one. Password-checking is case-sensitive. For security reasons, the password you enter will not be displayed. Please check the status of the Shift and Caps Lock keys. Function “Administrator Access” Use this function to restrict access to the server administration.
Please exercise caution with this function when all computers in the network have assigned IP addresses via DHCP: any current IP can be replaced by a new one only after the lease ends. Please use Lock console feature carefully in case of any erroneous IP address settings you will not be able to reset default administrator access from the console. To restore default settings you have to re-update software in the Open-E iSCSI module or contact technical support.
Function “SSL Certificate Authority” If you want to install Certificate Authority (CA) to your web browser, click on the SSLCert.crt link. Download CA on Desktop, click on it and "Install Certificate". Browser will show you a warning that CA is not trusted and it is normal. Following the instructions, you will install CA to your web server.
You can get information by: snmpwalk -v 3 -u public -l AuthNOPriv -A MD5 -A public123 adres_ip SysUpTime -v3 --> use only 3 version - u public --> community name - A MD5 --> encrypted by MD5 - A public123 --> password address_IP --> IP of iSCSI server SysUpTime --> OID with system uptime information To use SNMP from command line you have to know OID's, for example: • ssCpu (processor load), mem (memory info), Location. But it is not the best choice to retrieve info from command line.
• • • option: -p is a port for Remote Access. option: -l is a user (In our product the user must be "cli"). option: address_ip is a address of server you want to connect to. You will be ask for a password you entered on server for Remote Access. To connect to server from Microsoft Windows, download free ssh client Putty (www.putty.nl).
means that Open-E iSCSI is the only system attached to this UPS and that there is no action necessary to do remote shutdown for other systems in the network. Single means, that Open-E iSCSI is the only system attached to this UPS and that there is no action necessary to do remote shutdown for other systems in the network. Master means, that Open-E iSCSI is connected to the UPS and sends a signal through the network to shutdown other systems in the network.
Function “Set time” With this function, date and time can be entered manually. Alternatively, take the route via an NTP server, which has to be defined in the previous function. Function “Power button settings” • • • In this section you specify which action will be performed in case of power button is pressed Options: no action (none option), restart computer (reboot option), power off computer (halt option). Function “Motherboard info” With this function you can check info about your motherboard.
Next, the page will be reloaded, and status field will show your units as “in use” and with new group e.g. “vg0”. The Volume Group is the equivalent of a physical disk from the system point of view. It is also possible to combine two (or more) units into one Volume Group by choosing one of actually existing groups like “vg0”, or by choosing “new” option, which will create new group “vg1” after using “add” button. Function: Disks Localizer This function helps find disks in cage in your iSCSI server.
Depending on needed capacity administrator can add more capacity to particular Logical Volume. Using iSCSI Volume Manager Function you can add disk space to new LV and “snapshot” or increase size on existing iSCSI Volume and snapshot (you can’t decrease the size). To set needed iSCSI Volume size use scrollbar on the right side, it shows size available for use. In order to set the precise iSCSI Logical Volume size use left or right keyboard cursor key.
Function “Snapshot definition” This feature takes so-called snapshots of the file system. The Snapshot function of Open-E iSCSI enables the system administrator to freeze the data content of the targets volume at a period of time, this function is transparent to the user. From this moment on, the users work on a virtual data volume, all changes to the volume are stored in a different partition. The storage of all changes is independent of the file-system Open-E iSCSi uses on block-level.
Function “Create new target” To create a target assign a name or leave the "Target Default Name" option checked. Target name can contain alphanumeric characters: ' . ' ' : ' - ' A target name is considered case-insensitive. Every character entered will be converted to low-case. No spaces and no underscores are permitted. The server name will be used as a part of the default target name In this function you can create new targets, which will be seen in client stations as logical disks.
Function “Target Volume Manager” By using this function you can add available target volumes in premises of one target. In case of defining more than one target – free volumes will be available in actually edited volume. Analogically as with SCSI devices, it is possible to define LUN address device. Function “Target IP Access” You can assign network classes or specify individual IP addresses that have permission to access the target. Entries should be delimited by commas.
Function “Target Rename” This function provides a new target name. Function “Target Remove” Removing target removes all the volumes from the target. Please note that the data stored on the volumes are not automatically removed. You can assign the volumes to different targets and still see the data. Please remove the data prior to removing target in order to prevent leakage of sensitive or classified information.
Function: Target Snapshot Access You can assign network classes or specify individual IP addresses that are permitted or denied to access the snapshot. Entries should be delimited by commas. When no entries are present in Denied access or Allowed access fields everyone is permitted to access the snapshot. Specifying at least one entry in Allowed access field excludes all the clients that doesn't match it from accessing the snapshot.
CHAP user name cannot: o contain characters: ~ ! @ # $ ^ & ( ) + [ ] { } * ; : ' " ., % | < > ? / \ =` o begin or end with a space. Password cannot: o contain characters: ' " ` o spaces. o The length of the password must be within 12 - 16 characters. If CHAP users forget their password, there is no way to retrieve it. You can only set a new password. do this please use the function iSCSI Access Password situated in setup -> target manager -> targets.
Using snapshot with Open-E iSCSI Usage snapshot facility heavily depends on the initiator of software support for dynamic units* and the partition scheme which you use on the operating system where you attach the targets. The most common error is if on the client side that uses an LVM/LVM2 (Linux) scheme or Microsoft's Dynamic Disks which connect to the snapshot and original volume from the same client malfunctions.
e. The above procedure will greatly decrease the overload of a disk intended for data and will cut down the performance drop off in Open-E iSCSI with a snapshot turned on. 5.2.2 Maintenance This page accessed with the Maintenance tab contains settings and functions pertaining to general management operations. 5.2.2.1 Shutdown Function “System Shutdown“ When using this function, you can shut down the Open-E iSCSI. The Open-E iSCSI can only be turned on again manually.
Function “Connection reset” It might be necessary to restart the iSCSI daemon to inform client about specific setting changes, e.g. resize of the volumes. All current connections with iSCSI initiators will be terminated immediately. It may cause loss of unsaved data files. If your client does not reestablish the connections automatically you will have to do it manually from the clients. 5.2.2.2 Snapshot Here you can instantly create and remove snapshots.
5.2.2.4 Software Update This function allows you to update the system software. There are two ways of updating Open-E iSCSI software. During updating from share please follow this steps: In resources menu create share "update" with default path. 1. .Copy update file into update folder. 2. .Press Update button. 3. .Confirm update when you will be asked. Some updates need a system restart. In this case you will be informed about needed restart in confirmation message.
1. 2. 3. 4. 5. 6. During update from CD please follow this steps: Write down the actual NAS server IP address and NAS server name. After having updated NAS, please re-enter both. Write down authorization settings. Before Updating, please save “User”, “Groups”, “Shares” and Under Menu: “Maintenance -> Resources Misc -> Save resources”. Download and save NAS Server Logs: Menu status -> hardware in Function Logs click on “Download”, then save on your local HDD.
In order to download a new update you need to be registered at www.opene.com. You also have to remember to setup correct DNS and Gateway address in “setup” -> “network menu”. 5.2.2.5 S.M.A.R.T. Function: S.M.A.R.T. e-mail notification This function allows you to check S.M.A.R.T. status of hard disks and send it to e-mail address. S.M.A.R.T.
5.2.3.1 Network This function provides information on the IP address, Open-E iSCSI date and time and iSCSI status connections. 5.2.3.2 Hardware The “Hardware” option provides you with information on storage and network controllers and the drivers (e.g. network driver and IDE driver). In addition, you may also download the latest Open-E iSCSI log files, remove them, check memory (RAM) usage and motherboard info..
5.2.3.3 S.M.A.R.T. Through the S.M.A.R.T. system, modern hard disk drives incorporate a suite of advanced diagnostics that monitor the internal operations of a drive and provide an early warning for many types of potential problems. When a potential problem is detected, the drive can be repaired or replaced before any data is lost or damaged. • • Here you can find a tree with hard drives for which you can view S.M.A.R.T. information.
Function: S.M.A.R.T. info This function allows you to view S.M.A.R.T. parameters which this disk is able to return. In the upper part of this function you can see elementary parameters of hard drive such as device model or serial number. Below there is a table with S.M.A.R.T. attributes. In first column you will find an attribute name, in second minimum threshold value of this parameter, then current value, next worst value and after the status.
Function: S.M.A.R.T. test This function allows you to perform short and long tests of the hard drive. You will be informed about progress of the test. After the test finishes please click on "results" button to view test log. Performing a test is not recommended during normal (daily) usage of that hard drive. On some motherboards and controllers S.M.A.R.T. tests can not be performed. 5.2.
5.2.4.2 Fibre Channel When a fibre channel controller is detected you will find utilities and options specific to that hardware. Function: QLOGIC administration If a QLA23xx series controller is installed, you can use commandline tool in the Console Tools (press CTRL+ALT+F). The QLA23xx controller allows for remote administration. To access the configuration daemon download the client application SANsurfer from homepage provided by QLOGIC. Install it on your system and configure to access this server.
Available RAIDS: RAID 0: it is stripe array and requires, minimum 2 units. In RAID 0 You can set the Chunksize 4k - 256k. The destination size of the RAID Array will be sum of each drive size in array. RAID 1: mirror array requires 2 units. Destination size will be equal: (SINGLE)UNIT_SIZE, where (SINGLE) UNIT_SIZE is the size of the smallest unit in array. RAID 5: stripe + parity algorithm array (required, minimum 3 units - with the same capacity).
RAID 5 (layout) parity-algorithm It is possible to set one of four algorithms of placement data blocks and parity blocks in matrix. Our default option is left-symmetric, which is the best for large reads. Other recommended value is left-asymmetric.
Function: “S/W RAID E-mail notification “ It is possible to send notification by e-mail about events on software RAID arrays (e.g. rebuild started, rebuild finished, span is active). In order to do so please check Send array events. In order to “Send array events” you must enable E-mail notification in “setup” Æ “administrator”. • • If you check "Include resyncing/recovering progress" - you will be informed about progress of resync/rebuild if it is currently running.
Function: „Manager“ In this function you can manage RAID array Available operations: RAID 0: Construction of this RAID does not allowed to manage it anyway. Every unit must not be Failed. If any would be the whole array would be destroyed. • • • • • • • • • • • • RAID 1: To set unit as a Faulty one mark proper checkbox (in the column F) and click on Apply button. To delete any unit form an array mark proper checkbox (in the column R) and click on Remove button.
Function: „Info“ From this function you can obtain information like Creation Time, RAID Level, Array and Device Size, Update Time and state During syncing or rebuilding of array it is recommended to preform as few disk operations as possible. Status of syncing/rebuilding will be showed "live" - without need to refresh page manually. Function: „Software RAID unit remove“ This function allows you to remove Software RAID unit (MD[nr]).
By clicking on “Registration” in the “Help” menu you can register yourself at http://www.open-e.com. “About Open-E iSCSI ENTERPRISE” indicates which system version you are currently working with. In addition you find contact information regarding Open-E iSCSI Target; for instance how you can reach Open-E’s technical hotline if you should have problems or questions. You log out by closing the browser window.
6 Troubleshooting Guide Here is a list of common error messages and their meanings as well as corresponding tips on how to resolve the underlying problem. If your error message is not listed here please contact Open-E's support and service team (see section “help” above). Our staff will help you find a solution. Open-E iSCSI does not boot, keyboard LEDs are flashing This problem arises when you installed Open-E iSCSI into the secondary IDE slot by mistake.
7 Appendix A Open-E Software License agreement IMPORTANT: PLEASE READ THE TERMS AND CONDITIONS OF THIS LICENSE AGREEMENT CAREFULLY BEFORE USING THE SOFTWARE. OPEN-E GMBH AND/OR ITS SUBSIDIARIES ("OPEN-E") IS WILLING TO LICENSE THE SOFTWARE TO YOU AS THE INDIVIDUAL, THE COMPANY, OR THE LEGAL ENTITY THAT WILL BE UTILIZING THE SOFTWARE (REFERENCED BELOW AS "YOU OR YOUR") ONLY ON THE CONDITION THAT YOU ACCEPT ALL OF THE TERMS OF THIS LICENSE AGREEMENT.
Disclaimer of Warranties Open-E software are licensed "as is" without warrantee of any kind. Open-E GmbH hereby disclaims all warranties express and implied, relating to Open-E , the installation utilities and the embedded software including, without limitation, any implied warrantee of merchantability, fitness for a particular purpose or non-infringement. Limitation of Liability In no event will Open-E GmbH liability under this agreement exceed the price that you paid for your Open-E software.
8 Appendix B GNU GENERAL PUBLIC LICENSE Version 2, June 1991 Copyright (C) 1989, 1991 Free Software Foundation, Inc. 59 Temple Place, Suite 330, Boston, MA 02111-1307 USA Everyone is permitted to copy and distribute verbatim copies of this license document, but changing it is not allowed. Preamble The licenses for most software are designed to take away your freedom to share and change it.
The precise terms and conditions for copying, distribution and modification follow. GNU GENERAL PUBLIC LICENSE TERMS AND CONDITIONS FOR COPYING, DISTRIBUTION AND MODIFICATION 0. This License Agreement applies to any software library or other program which contains a notice placed by the copyright holder or other authorized party saying it may be distributed under the terms of this Lesser General Public License (also called "this License"). Each licensee is addressed as "you".
b) You must cause the files modified to carry prominent notices stating that you changed the files and the date of any change. c) You must cause the whole of the work to be licensed at no charge to all third parties under the terms of this License.
above provided that you accompany it with the complete corresponding machinereadable source code, which must be distributed under the terms of Sections 1 and 2 above on a medium customarily used for software interchange.
be distributed under Sections 1 and 2 above); and, if the work is an executable linked with the Library, with the complete machine-readable "work that uses the Library", as object code and/or source code, so that the user can modify the Library and then relink to produce a modified executable containing the modified Library.
b) Give prominent notice with the combined library of the fact that part of it is a work based on the Library, and explaining where to find the accompanying uncombined form of the same work. 8. You may not copy, modify, sublicense, link with, or distribute the Library except as expressly provided under this License. Any attempt otherwise to copy, modify, sublicense, link with, or distribute the Library is void, and will automatically terminate your rights under this License.
12. If the distribution and/or use of the Library is restricted in certain countries either by patents or by copyrighted interfaces, the original copyright holder who places the Library under this License may add an explicit geographical distribution limitation excluding those countries, so that distribution is permitted only in or among countries not thus excluded. In such case, this License incorporates the limitation as if written in the body of this License. 13.
How to Apply These Terms to Your New Libraries If you develop a new library, and you want it to be of the greatest possible use to the public, we recommend making it free software that everyone can redistribute and change. You can do so by permitting redistribution under these terms (or, alternatively, under the terms of the ordinary General Public License). To apply these terms, attach the following notices to the library.