Instruction Manual Bedienungsanleitung Manuel d’utilisation Manuale di Istruzioni
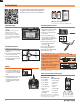
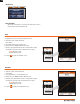
EN Getting Started To get more information, including details on downloading the Spektrum™ AS3X® Mobile Programming Application, visit www.SpektrumRC.com/AS3X or scan this QR code. *Minimum system requirements: iOS 6.0, iPhone 4, iPod 4th gen and Android 4.0 Transmitter Setup Connecting to the Receiver 1. Connect the servo plug on the audio interface cable to the BIND/ PROG port on your receiver. • Set all transmitter settings to default.
EN Navigation 1. 2. The and move to the next or previous screen in the Wizard. appears at the end of the Wizard. Tap the square to save the airplane configuration and to exit the Wizard. The Wizard The Wizard starts automatically when you open the app for the first time. Model Setup 1. Select a photo for the model (optional). 2. Name the Model. 3. Select the receiver that you want to program. If a receiver is already bound and connected to the mobile device, the app will auto-detect the receiver. 4.
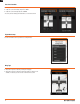
EN Receiver orientation Tell the app how the receiver is mounted in your aircraft. 1. To flip the receiver horizontally, swipe LEFT or RIGHT. 2. To flip the receiver vertically, swipe UP or DOWN. The servo pins must always point toward the nose or tail of the aircraft. Flight Mode Setup Select the transmitter channel you want to use for flight modes. Wing Type 1. Swipe left or right across the wing to change the wing type. 2. Swipe left or right across the tail to change the tail type.
EN Port Assignment The port assignment screen shows you where to connect the servos to the receiver. No options are available on this screen; it is only used for reference. Failsafe You have the option of selecting Preset or Hold for each receiver port. If you aren’t sure what each port does, tap the to return to the Port Assignment screen.
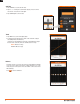
EN Sub Trim 1. Tap SUBTRIM to access the sub trim value. 2. Tap the - or + to change the sub trim value. Tapping - moves the trim to the Left and + moves the trim to the Right. 3. Tap SUBTRIM again to save the value. Travel 1. Tap TRAVEL to access the travel adjust graph. 2. To adjust the travel values drag up or down on the vertical line to adjust the Left/Right values simultaneously. • Directions can be adjusted at the same time or independently.
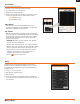
EN Exit the Wizard Surface Setup is the last step in the Wizard. Press the in the upper right corner to save settings and exit the Wizard. The application will display the AS3X Settings menu after exiting the Wizard. AS3X Settings Initial Setup The Initial Setup menu enables you to view individual screens without using the Wizard. You will also use the Initial Setup menu to perform a Model Reset, share model files via e-mail or access the Wizard.
EN Model Reset Resets the active model in the application. Share Via Email Attaches the active model file to a new email. The email recipient can open the attachment in the AS3X Programmer app. Expo • Positive Expo decreases control stick sensitivity near center. • Negative Expo increases control stick sensitivity near center. 1. Swipe left or right to change between Roll, Pitch and Yaw. 2. Select a flight mode to access the Expo curve. 3. Drag the curve UP or DOWN to adjust the Expo values.
EN Gain & Priority Gain is a percentage of the Travel value. 1. Swipe left or right to change between Roll, Pitch and Yaw 2. Select a flight mode to access the Gain curve. 3. Drag the curve to adjust the Gain values. • Directions can be adjusted at the same time or independently. To adjust directions at the same time, make sure both directions are orange.
EN Dashboard The Dashboard screen enables you to see all of the gain, dual rate and expo settings for each Flight Mode. You can also adjust the values by selecting any of the value boxes. Contact Information Country of Purchase United States of America Horizon Hobby Contact Information Horizon Service Center (Repairs and Repair Requests) servicecenter.horizonhobby.com/RequestForm/ Horizon Product Support (Product Technical Assistance) Address www.quickbase.