
Installation Instructions

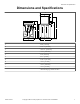
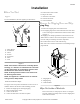
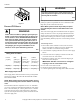
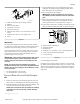
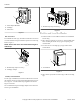
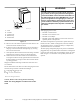
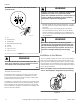
Table Of Contents
- Table of Contents
- Dimensions and Specifications
- Installation
- Installer Checklist

TLW2221N_SVG
2
1
3
1. 562P3 Siphon Break Kit
2. Standpipe
3. Drain Hose
Figure 6
Wall Installation
For installations of this type, the drain hose MUST be secured to
one of the fill hoses using the beaded strap from accessories bag.
Refer to Figure 7 .
NOTE: End of drain hose must not be below height of
cabinet top.
W329I_SVG
2
1
1. Beaded Strap (tape if necessary)
2. Standpipe Adapter
Figure 7
Laundry Tub Installation
For this type of installation, the drain hose MUST be secured to
the stationary tub to prevent hose from disloding during use. Re-
fer to Figure 8 . Use the beaded strap (supplied in accessories
bag) to secure hose.
We recommend leaving the standpipe adapter on the drain hose
for this type of installation.
TLW2222N_SVG
1
1. Beaded Strap (tape if necessary)
Figure 8
Position and Level the Washer
1. Position washer so it has sufficient clearance for installation
and servicing.
2. Place washer in position on a clean, dry, and reasonably firm
floor. Installing the washer on any type of carpeting is not
recommended.
3. For easier access to leveling legs, prop up washer with a
wooden block.
TLW1977N_SVG
1
1. Wood Block
Figure 9
4. Place rubber cups (from accessories bag) on all four leveling
legs.
Installation
8
©
Copyright, Alliance Laundry Systems LLC - DO NOT COPY or TRANSMIT Part No. 203177