TWO MAN HAND HELD EARTH AUGER S241003C0 Owner’s Manual Assembly & Operating Instructions This safety alert symbol identifies important safety messages in this manual. Failure to follow this important safety information may result in serious injury or death.
Table of Contents Page(s) Important Safety Information ................................................................................................ 1-2 Intended Use .............................................................................................................. 1 Personal Protective Equipment ..................................................................................... 1 Operating Safety ..................................................................
WARNING: Read and thoroughly understand all instructions and safety information before assembling or operating this hand held digger. Failure to do so may cause serious injury or death. Do not allow anyone to operate this digger who has not read this manual. As with all power equipment a hand held digger can be dangerous if assembled or used improperly. Do not operate this digger if you have doubts or questions concerning safe operation.
If an obstruction is encountered during operation, release the throttle control until the engine idles down. Then remove the earth auger from the ground and turn it off. Remove the obstruction, if possible, and resume digging. NEVER tilt the gas tank if the engine is running, hot or if the unit is indoors. NEVER have the throttle control fully open when starting. You could easily lose control of the digger.
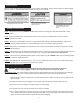
SAFETY DECALS Make sure that all safety warning decals are in good condition and readable. Always replace missing or defaced decals. Write or call us at 1-800-525-8322 and they will be sent to you at no charge. PART NUMBER: DL52-04-58 LOCATION: BACK OF GAS TANK PART NUMBER: DL52-04-59 LOCATION: PLASTIC COVER NEAR EXHAUST ASSEMBLY INSTRUCTIONS PART NUMBER: DL52-04-60 LOCATION: TOP OF GAS TANK NOTE: This manual covers the SPEECO Two Man Hand Held Post Hole Digger model S241003D0 with a 196cc engine.
STARTING INSTRUCTIONS IMPORTANT NOTE: Storing the power head in temperatures below 20 Degrees F could result in difficult starting. 1) Place one finger on the red Emergency Shutoff Switch(39). Releasing this switch stops the engine and prevents it from starting. 2) Move the choke lever to the “ON” position. 3) Move the throttle control to low. Grasp the starter cord and pull.
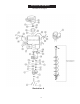
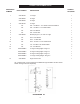
S241003C0 TWO MAN MODEL See Parts List on Page 6 Illustration A 5
PARTS BREAKDOWN FOR S241003C0 HAND HELD DIGGER Refer to Illustration on Page 5 REFERENCE NUMBER PART NUMBER DESCRIPTION NUMBER REQUIRED S241003C0 Two-Man Earth Auger 1 A S24123300 Gear Box 1 1 O/L M6 x 40 Bolt 2 2 O/L M6 x 60 Bolt 4 3 -- Output Shaft 1 4 -- Ball Bearing - 6004 3 5 -- Reducer Case 1 6 -- Ball Bearing - 6202 2 7 -- Snap Ring - 20 2 8 -- Pinon Gear 1 9 -- Gear 1 10 -- Dowel Pin - 6 x 12 1 11 -- Gear 1 12 -- Dowel Pin - 5 x 12 1 13 --
B S24125200 Clutch Assembly 1 29 -- Fastener Screw - M6 x 10 1 30 -- Clutch 1 41 -- Clutch Spring 2 31 O/L Carriage Bolt - 4 x 16 1 32 O/L M8 - Nut 3 Engine 1 33 37 O/L M6 x 14 - Bolt 2 38 -- Insert Rim 1 39 S24125800 Emergency Switch 1 40 -- Cable 1 O/L - Obtain Locally. Common fasteners available through hardware and farm stores.
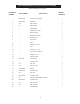
AUGERS & REPLACEMENT PARTS REFERENCE NUMBER 1 PART NUMBER NUMBER REQUIRED DESCRIPTION S24105700 10” Auger 1 S24105500 8” Auger 1 S24105300 6” Auger 1 2 S24105100 4” Auger 1 3 O/L 3/8” - 18 UNC X 1-1/4” Grade 5 Socket Head Bolt 1 4 O/L 3/8” - 18 UNC x 1-3/4” Grade 5 Bolt 1 5 O/L 3/8” Lock Washer 1 6 O/L 3/8” -18 UNC Nut 1 7 S24104900 Shaft Spring for 6”, 8” and 10” Auger 1 8 O/L 5/16” Lock Washer 4 9 O/L 5/16” - 18 UNC Nut 4 10 O/L 5/16” -18 UNC x 2-1/4” Grade 5
LIMITED WARRANTY This earth auger is guaranteed to be free from defects in material and workmanship for one year from the date of purchase. Speeco will repair or replace free of charge any part or parts of the earth auger that in our judgement is found to be defective in material or workmanship during the warranty period stated above. The replaceable screw point and cutting blade are not covered under this warranty.