
User's Manual
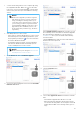

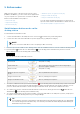
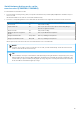
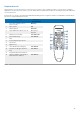
Table Of Contents
- User manual
- Table of Contents
- 1. Important
- 2. Your SpeechOne
- 3. Get started
- 4. Use your SpeechOne
- 5. Button modes
- 6. Service and support
- 7. Technical data
- 8. Certifications

1. Connect the docking station to the computer by using
the supplied USB cable. Make sure you use the USB
port for PC connection marked with on the docking
station. Then place the SpeechOne onto the docking
station.
NOTE
Make sure to upgrade your device together
with all the accessories you are commonly
using, including the docking station (or for
some devices the optional remote control). If
you are using your device together with the
optional Philips AirBridge, make sure to also
upgrade any other hardware you are com-
monly using with your device (e.g. the dock-
ing station).
2. Start Philips Device Control Center:
• If the option to start the Philips Device Control Center
automatically was selected during installation, open
the program by clicking the icon in the notication
area of the Windows task bar.
• To manually start the program, open the Windows
start menu in Windows and select Philips Speech
Control > Philips Device Control Center.
NOTE
Make sure that you're using the latest version
of Philips Device Control Center.
3. On the Device tab, click on Firmware upgrade.
4. Click on the desired upgrade version from the Available
rmware versions list.
If the
Available rmware versions list is empty, you can
also manually check our website for rmware upgrades.
The latest rmware upgrade for your SpeechOne is
available here, where you can download it manually
from the website.
Click the Import button and select the folder with the
rmware les to be imported.
5. Click the Upgrade button.
6. Choose Yes, upgrade the device to install the new rm-
ware.
• The rmware upgrade takes about 30 seconds.
• When the rmware upgrade is nished, the Speech-
One and the docking station are shortly disconnected
and the button LEDs on the docking station glow or-
ange.
21