
Instructions / Assembly

Marquis
Installation Instructions
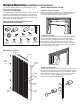
4. Hang Door onto Track
Swing one end of the top track outward. Decide if the door
will open from the left or the right, then slide all of the top
glides onto the track. Stack the panels together near the
center screw. Swing the track back to its original position.
5. Secure the Top Track
Drill pilot holes through the remaining pre-drilled holes in the
top track and secure the track with the Track screws
provided. Set all screws as straight and tight as possible to
ensure the smooth operation of the door.
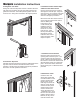
6. Install the Anchor Channel Clips
and Secure the Anchor Panel
Use the closure channel to measure
and align the channel clips. Align the
channel on the non-opening side of the
door jamb. Make sure the top of the
channel is straight up and down.
Mark each of the ve closure channel
screw holes and remove the closure
channel. Make pilot
holes (with a nail or
a 3/32” drill bit) and
install the channel
clips loosely, using
ve of the 1” round-
head screws. Align
the clips vertically and
fully tighten screws.
Press the door anchor
panel onto them until it
snaps into place.
7. Install the Closure Channel
Place the closure channel on the
opening side of the door jamb. Use
a level to make sure the channel is
plumb. Mark the pre-drilled holes in
the channel. Remove the channel and
drill pilot holes where you marked the
jamb. Secure the closure channel to
the jamb using the 1” athead screws
provided.
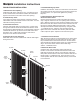
8. Attach Door Latch
Close the door until
almost fully closed and
mark the location on the
closure channel where
the latch hole on the
lead edge would hit the
channel. Place the top
of the door latch piece
at this location on the
closure channel and
secure the latch with a
1” athead screw. Once
the door is in the closed
position and the door is
latched, the key can be
used to lock the door.