
User guide


84
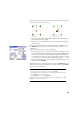
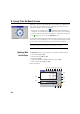
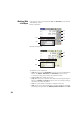
• When you have located the design point and you wish to collect a static RTK
occupation at this point in order to get a more precise position averaged
from multiple epochs, you should toggle to occupying mode by tapping the
>ROVING button (which is then changed into an >OCCUPYING button). This
will turn the receiver into static mode for the occupation.
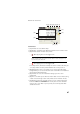
• When you are satisfied with the occupation results, you can tap Accept to
finish the stakeout measurement. Depending on the acceptance criteria
you set on the Stakeout tab, the button label may show Wait xx before it
becomes an Accept button. The screen then shows the results of the
position computation for the staked point.
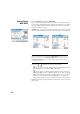
NOTE 1: At this stage, you may tap Shot to re-measure the point. You may also
change the elevation of the design point by tapping Change.
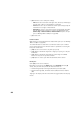
NOTE 2: If you are simultaneously collecting raw data for post-processing, the as-
staked point is automatically stored when you tap Accept on the previous screen,
provided you did a static occupation on the point.
WARNING: Be sure you are using the Store button to store stakeout data. The Topo
SS button only stores sideshot data.
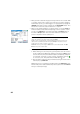
• Stake the point and then do one of the following:
1. Before moving on to the next point, you may want to store the location
of the as-staked point: While still standing on the target, tap Store, name
and describe the point (the default description prompted by Survey Pro
is in the form “ST<name_of_point_you have_just staked>), then tap
to collect the point. This point will be marked with a icon.
2. Or If you wish to stake the next point without storing the results of this
staked point, tap Stake Next.
Whatever your choice, you will then be taken back to the Stake Points screen
with the next point to stake automatically selected, (based on the Increment
value you entered previously).