
User guide

68
Creating or Selecting
a Level Loop
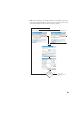
• From the main menu, tap Survey > Select/Create Loop.
NOTE: Survey Pro will list all the level loops that haven’t been closed yet. You may
select one of them and tap Activate Selected Loop to choose to work in this level loop.
• To create a new level loop, tap on the New Loop button. This opens the New
Level Loop screen.
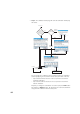
• Enter a name for the new level loop (e.g. MyLoop).
• Tap on to define the opening CBM. The point may be selected from
either the map or the list of points. You may also create the opening CBM
at this stage.
NOTE: The opening CBM must be a point in the job with a user-entered, keyed-in
elevation. You cannot select points derived from measurements for your opening
CBM.
• Tap Next.
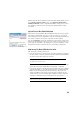
•Use the Desc field to enter a description for the level loop (e.g.
“Boundaries”). Below this field, the current definition of the level loop you
want to create is displayed. You may tap Back if you wish to modify this
definition.
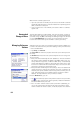
• When the definition of the level loop is complete, tap the Create Loop
button. A message is then displayed prompting you to proceed with level
measurements in the loop.
• Tap OK to close the message. This automatically opens the screen from
which you can start collecting elevations in the level loop. (This screen can
also be accessed from the main menu by tapping Survey then Level.)