
User guide


43
Point Measurement Introduction to Traverse / Sideshot
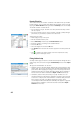
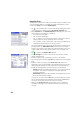
• Tap Survey > Traverse / Sideshot. This screen allows you to make traverse and
sideshot measurements. It also provides access to the station setup via the
Backsight button allowing you to either check the current setup or start a
new setup. The current setup is summarized at the top of the screen.
• Enter the name (Foresight) and description (Desc.) of the point you will now
be measuring, as well as the type and height (HR) of the target used on that
point.
• The next step is choosing between sideshot or traverse.
Choosing “Sideshot” means you simply want to take a measurement of the
point. (See Sideshot on page 43.)
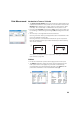
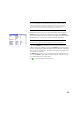
Choosing “Traverse” (see illustration below) means you are expected to
move the instrument to that point either immediately or after measuring
other points (sideshot).
This implies a new station setup is required after moving the instrument.
(See Traverse on page 44.)
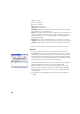
Sideshot
• Be sure the instrument is pointed at the target placed over the point.
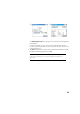
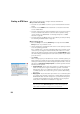
• Tap Sideshot. Survey Pro returns the results of the measurement in the
lower portion of the screen ([1]). The point name is automatically
incremented for the next measurement. Tapping on the Result tab will
provide more information on the measurement made ([2]).
PT1 PT2
Instrument Target
[1]
PT1 PT2
InstrumentTarget
[2]
[1] [2]