
Manual


62
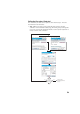
When you get closer to the design point, the graphic will change to assist
you in more precisely locating the design point. The point to stake becomes
the fixed center of the display and the rod becomes the object that is
moving. This aids in precisely positioning the rod over the point. A red arrow
indicates the direction in which to go.
1. Distance to go is between 3.0 and 0.3 m (10 and 1 ft): Four dark-green
spots appear around the graphic.
2. Distance to go is less than 0.3 m (1 ft): The spots around the graphic
turn light green.
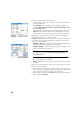
• When you are satisfied with the location of the target, tap Done to access
the Stake Points screen. The screen indicates how close you are to the
design point.
• Stake the point and then do one of the following:
1. Before moving on to the next point, you may want to store the location
of the as-staked point: While still standing on the target, tap Store, name
and describe the point, then tap to collect the point.
2. Or If you wish to stake the next point without storing the results of this
staked point, tap Stake Next.
Whatever your choice, you will then be taken back to the Stake Points screen
with the next point to stake automatically selected, (based on the Increment
value you entered previously).
NOTE: At this stage, you may:
- Change the elevation of the design point after tapping Change.
- Tap the Turn button to automatically turn the instrument toward the design point.
- Tap the Shot button to re-measure the point.
- Collect a Topo SS point using the Topo SS button.
WARNING: Be sure you are using the Store button to store stakeout data. The Topo
SS button only stores sideshot data.