
Manual


Note: If you specify an existing point in the Point field, you are prompted to overwrite or use the next available point.
You will not have the option to store an observation.
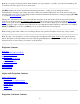
[Set HR]: Displays the current antenna measurement and measure to setting. You can change the antenna
measurement by entering a new value in the edit box. This new antenna height will be sent to the receiver with your
next data quick code point. You can change both the antenna measurement and measure to setting by tapping [Set HR]
to open the Receiver Antenna screen.
Tapping any of the buttons will store a point with the description of the button label. If the Occupy Point in Quick
Codes box is checked on the Job | Settings | Surveying card, the receiver is put into static mode and the Occupy Data
Points screen opens. If the box is not checked, the point will be stored with a single epoch of data from the receiver,
without going into static occupation mode. The point is stored with the description labelled on the button, for example,
[Ditch] or [TOPO]. You can also tap [Enter] to store a point with the last used description.
Note: Storing points in this routine does not change the last user specified description used in any survey routine.
Note: To enter a new description, or edit an existing button description in the Quick Codes screen, tap and hold the
button. The Quick Code button labels are saved in the \Program Files\Survey Pro\QuickCodes.ini file. You can copy
these files from one data collector to another to preload the list.
Projection Contents
Projection
Default Ground Calibration Mode
Calibration Set Zone
Mapping Plane
Select Coordinate System
Key In Zone
Ground Coordinates
Projection Details
Solve Calibration
Select Database
Adjust with Projection Contents
Adjust with Projection
Select Points
Select Source Coordinate System
Select Destination Coordinate System
Prompt Adjust
Results
Adjust More
Projection Calculator Contents
98