
Reference Manual


Table Of Contents
- Table of Contents
- Welcome
- Main Menu
- File Menu
- Job Menu
- Job Menu – GPS
- Job Menu – Basic GPS
- Survey Menu
- Backsight Setup
- Traverse / Sideshot
- Repetition Shots
- Multiple Sideshots
- Radial Sideshots
- Distance Offset Shot
- Horizontal Angle Offset
- Vertical Angle Offset
- Auto Collect
- Corner & 2 Lines
- Corner & Angle
- Corner & Offset
- Corner & Plane
- Surface Scan
- Video Scan
- Shoot From Two Ends
- Record Mode
- Resection
- Remote Elevation
- Check Point
- Solar Observation
- Remote Control
- Survey Menu – GPS
- Survey Menu – Basic GPS
- Leveling Menu
- Stakeout Menu
- Stakeout Menu – GPS and Basic GPS
- Inverse Menu
- Cogo Menu
- Curve Menu
- Roads Menu
- Adjust Menu
- Miscelaneous Screens
- Appendix A
- Index
Survey Pro Reference Manual
R-262
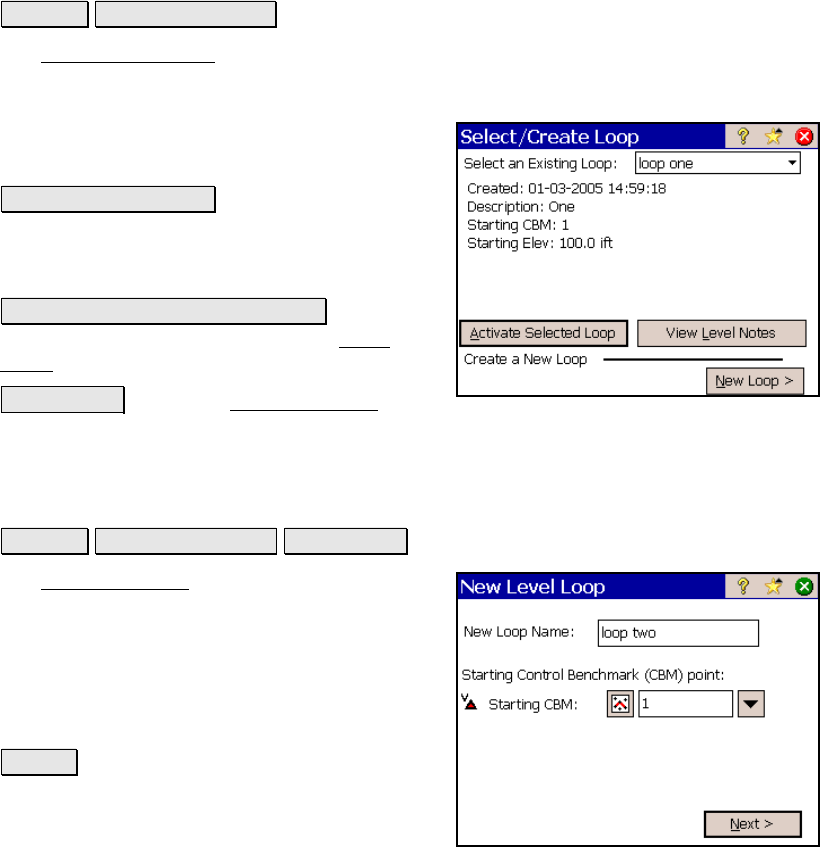
Select/Create Loop
Leveling Select/Create Loop.
The Select/Create Loop screen is used to select a loop that has not yet
been closed, view the notes for any existing loop, or create a new level
loop.
Select an Existing Loop: allows you to select
an existing loop from the dropdown list.
Activate Selected Loop : opens the selected loop
so new data can be added to it. (This button
will not be available when a closed loop is
selected.)
View Level Notes for Selected Loop : displays
the notes for the selected loop in the Level
Notes screen, described below.
New Loop > : opens the New Level Loop
screen, described next, where a new loop can be created.
New Level Loop
Leveling Select/Create Loop New Loop >.
The New Level Loop screen is used to create a
new level loop.
New Loop: is where you enter a name for the
new loop.
CBM: is the starting benchmark. This point
must exist in the current job.
Next > : opens the next screen.