
Reference Manual


Table Of Contents
- Table of Contents
- Welcome
- Main Menu
- File Menu
- Job Menu
- Job Menu – GPS
- Job Menu – Basic GPS
- Survey Menu
- Backsight Setup
- Traverse / Sideshot
- Repetition Shots
- Multiple Sideshots
- Radial Sideshots
- Distance Offset Shot
- Horizontal Angle Offset
- Vertical Angle Offset
- Auto Collect
- Corner & 2 Lines
- Corner & Angle
- Corner & Offset
- Corner & Plane
- Surface Scan
- Video Scan
- Shoot From Two Ends
- Record Mode
- Resection
- Remote Elevation
- Check Point
- Solar Observation
- Remote Control
- Survey Menu – GPS
- Survey Menu – Basic GPS
- Leveling Menu
- Stakeout Menu
- Stakeout Menu – GPS and Basic GPS
- Inverse Menu
- Cogo Menu
- Curve Menu
- Roads Menu
- Adjust Menu
- Miscelaneous Screens
- Appendix A
- Index
Survey Pro Reference Manual
R-186
This button only shows when the selected receiver is using the
Bluetooth port.
Connect>: sets the selected instrument as the current active
instrument, begins communicating with the device, and opens the
next setup screen in the Start GPS Survey
wizard.
Note: When the current active instrument is Demo Mode, only the
Demo Mode receiver will show up in the list. If you are in Demo Mode
and you wish to begin surveying with a real receiver, tap Receiver
Settings or Create Receiver to activate the desired instrument.
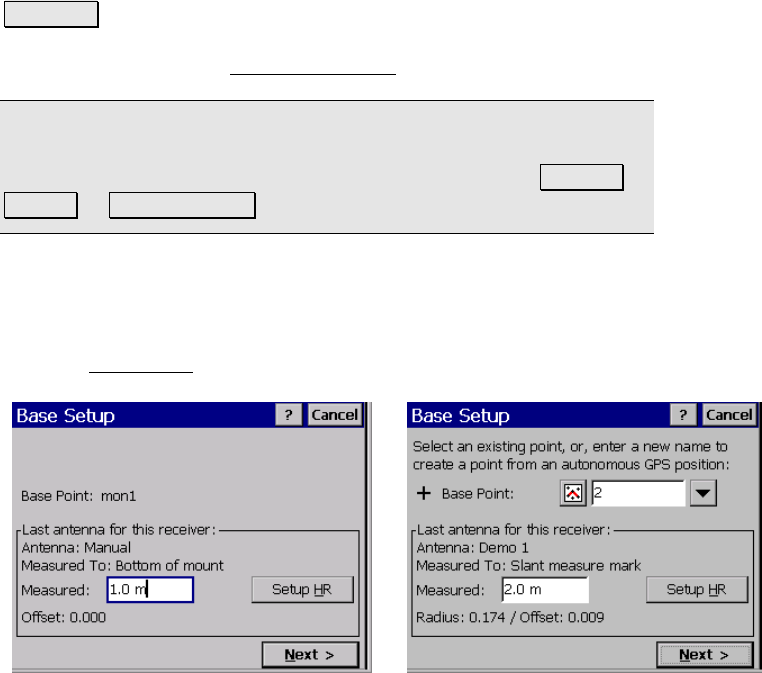
Base Setup
Base Setup One – Pick Base Point
The first Base Setup screen is used to pick the base point and set the
antenna height.
Base Point: is where you enter the point name that the base antenna
is set up over, or displays the name of the remote base point or the
name of the one job file point when using one point setup mode. You
can enter an existing point, or enter a new point name to start this
survey from a new autonomous base setup.
Base Setup, standard Base Setup, one point setup