
Reference Manual Owner manual


Survey Pro Reference Manual
R-332
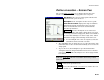
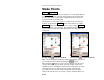
Note: The Display Directions As field in the Stakeout Settings screen
configures the format for the text that directs you to the design point.
CUT / FILL: displays the required cut or fill between the current
elevation and the design point.
Ref: 0°00’00”… : opens a screen where you can select a reference
azimuth or point, which will then be displayed on the navigation
graphic as a blue line to assist in orienting yourself. When Auto Snap
to Reference When Close is checked in this screen and when using the
navigation method, the navigation method will automatically
switch to the
method when you are within 3 meters of the design
point. (Checking this box while in using the
navigation method
has no effect.)
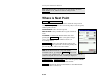
OCCUPYING / ROVING : switches from ROVING to OCCUPYING
mode. When ROVING, the receiver is in dynamic mode and will
calculate your position as you move to the point. When OCCUPYING,
the receiver is switched to static mode (depending on settings) and
will calculate the most precise position for the staked point.
Topo SS : allows you to store a side shot measurement during stake
out.
Accept : opens the third and final Stake Points screen where the
current stake point can be staked and optionally stored. When post-
processing and in Occupying mode, this button will be labeled Store
and will signal the end of the occupation and store the point.
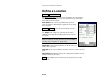
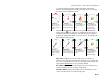
Stake to Line
Stakeout Stake to Line.
The Stake to Line screen allows you to locate points on a continuous
predefined line. Direction information is provided to locate the line
by traveling the shortest possible distance (a perpendicular offset to
the line) between the rover and the line.
The first screen of this routine is similar to the conventional method,
except that the Backsight button is replaced with a Setup HR button