
Reference Manual Owner manual
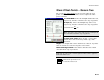


Survey Pro Reference Manual
R-316
Usually the difference between International Feet and US Survey
Feet is negligible (2 parts per million), but when dealing with State
Plane or UTM mapping plane coordinates, which are often very large
in magnitude, the difference can be considerable if the coordinates
are converted from one format to the other.
If importing coordinates from a source where you are not sure if the
units are in International Feet or US Survey Feet into a job that is
set to International Feet or US Survey Feet, you will usually just
want to import them without any conversion being performed. To do
this, be sure to select the same distance units for the source file as
those set for the current job.
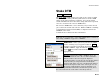
Store Point: is the starting point number if points are stored during
the staking process. Future points are stored with the next available
point names.
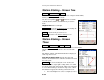
HR: is the rod height.
: opens the Smart Target options (Page R-444).
; With Centerline: When checked, offset and stationing information
from the selected centerline to the stake point is also provided in the
DTM Shot
screen.
Choose a Centerline… : will open the Select Line screen, described
next, where an existing polyline or alignment can be selected that
describes a centerline.
; Generate DTM with Staked Points: will add any staked points to
the non-reference DTM layer and generate a DTM surface for all the
objects on this layer. This DTM surface will be updated when a new
point is stored to it. You can also view this surface with live cut/fill
volumes at anytime from the 3D View
screen (Page R-83).
Note: Viewing the DTM during DTM Stakeout is a useful quality
assurance technique to determine where additional points are
needed.
Setup / View DTM : accesses the Setup DTM 3D screen (Page R-78)
where the non-reference DTM layers are configured and optionally
viewed from the 3D View
screen (Page R-83).